
How to Sell Wholesale in Webflow: B2B Pricing with Shopify (No Plus Required)
Sell to wholesale buyers from your Webflow site. Approved customers log in and see their catalog prices everywhere, computed exactly as checkout charges them, while everyone else sees your normal retail store.
With Storesynk you can run your wholesale channel on the same Webflow site as your retail store. Approved wholesale customers log in and see their negotiated prices everywhere prices appear: product pages, collection lists and the cart. Everyone else sees your normal retail prices, and every wholesale widget hides itself for them.
Storesynk computes wholesale prices the same way checkout charges them, so the price on the product page, in the cart and at checkout always match. No duplicate sites, no password-protected clones, no spreadsheet order forms.
In this guide you will set up a pricing catalog and customer group in the Storesynk Shopify App, add a wholesale application form, display wholesale prices and volume tiers and gate content for wholesale customers.
Prerequisites
- Storesynk engine 2.3.0 or newer installed on your Webflow site. New to Storesynk? Follow the installation guide first.
- Customer accounts with the callback login flow. Wholesale pricing is tied to the logged-in customer. With the callback flow, customers start logging in from your Webflow site, sign in on Shopify's secure login screen and are sent back to your site, where Storesynk completes the session. That is how Storesynk knows who is logged in. Your account pages can live in Webflow or on the Shopify-hosted customer portal. Setup is covered in How to use passwordless Shopify customer accounts in Webflow with Storesynk.
- The Storesynk Shopify App. You will create the wholesale catalog and customer group in step ① below.
① Set up your catalog and customer group in the Storesynk Shopify App
Pricing lives in the Wholesale section of the Storesynk Shopify App in your Shopify admin. A wholesale catalog defines the pricing rules and a customer group defines who receives them. Create the catalog first, then the group.
1. Open the Storesynk Shopify App and go to Wholesale. The setup checklist on the overview mirrors the steps below.
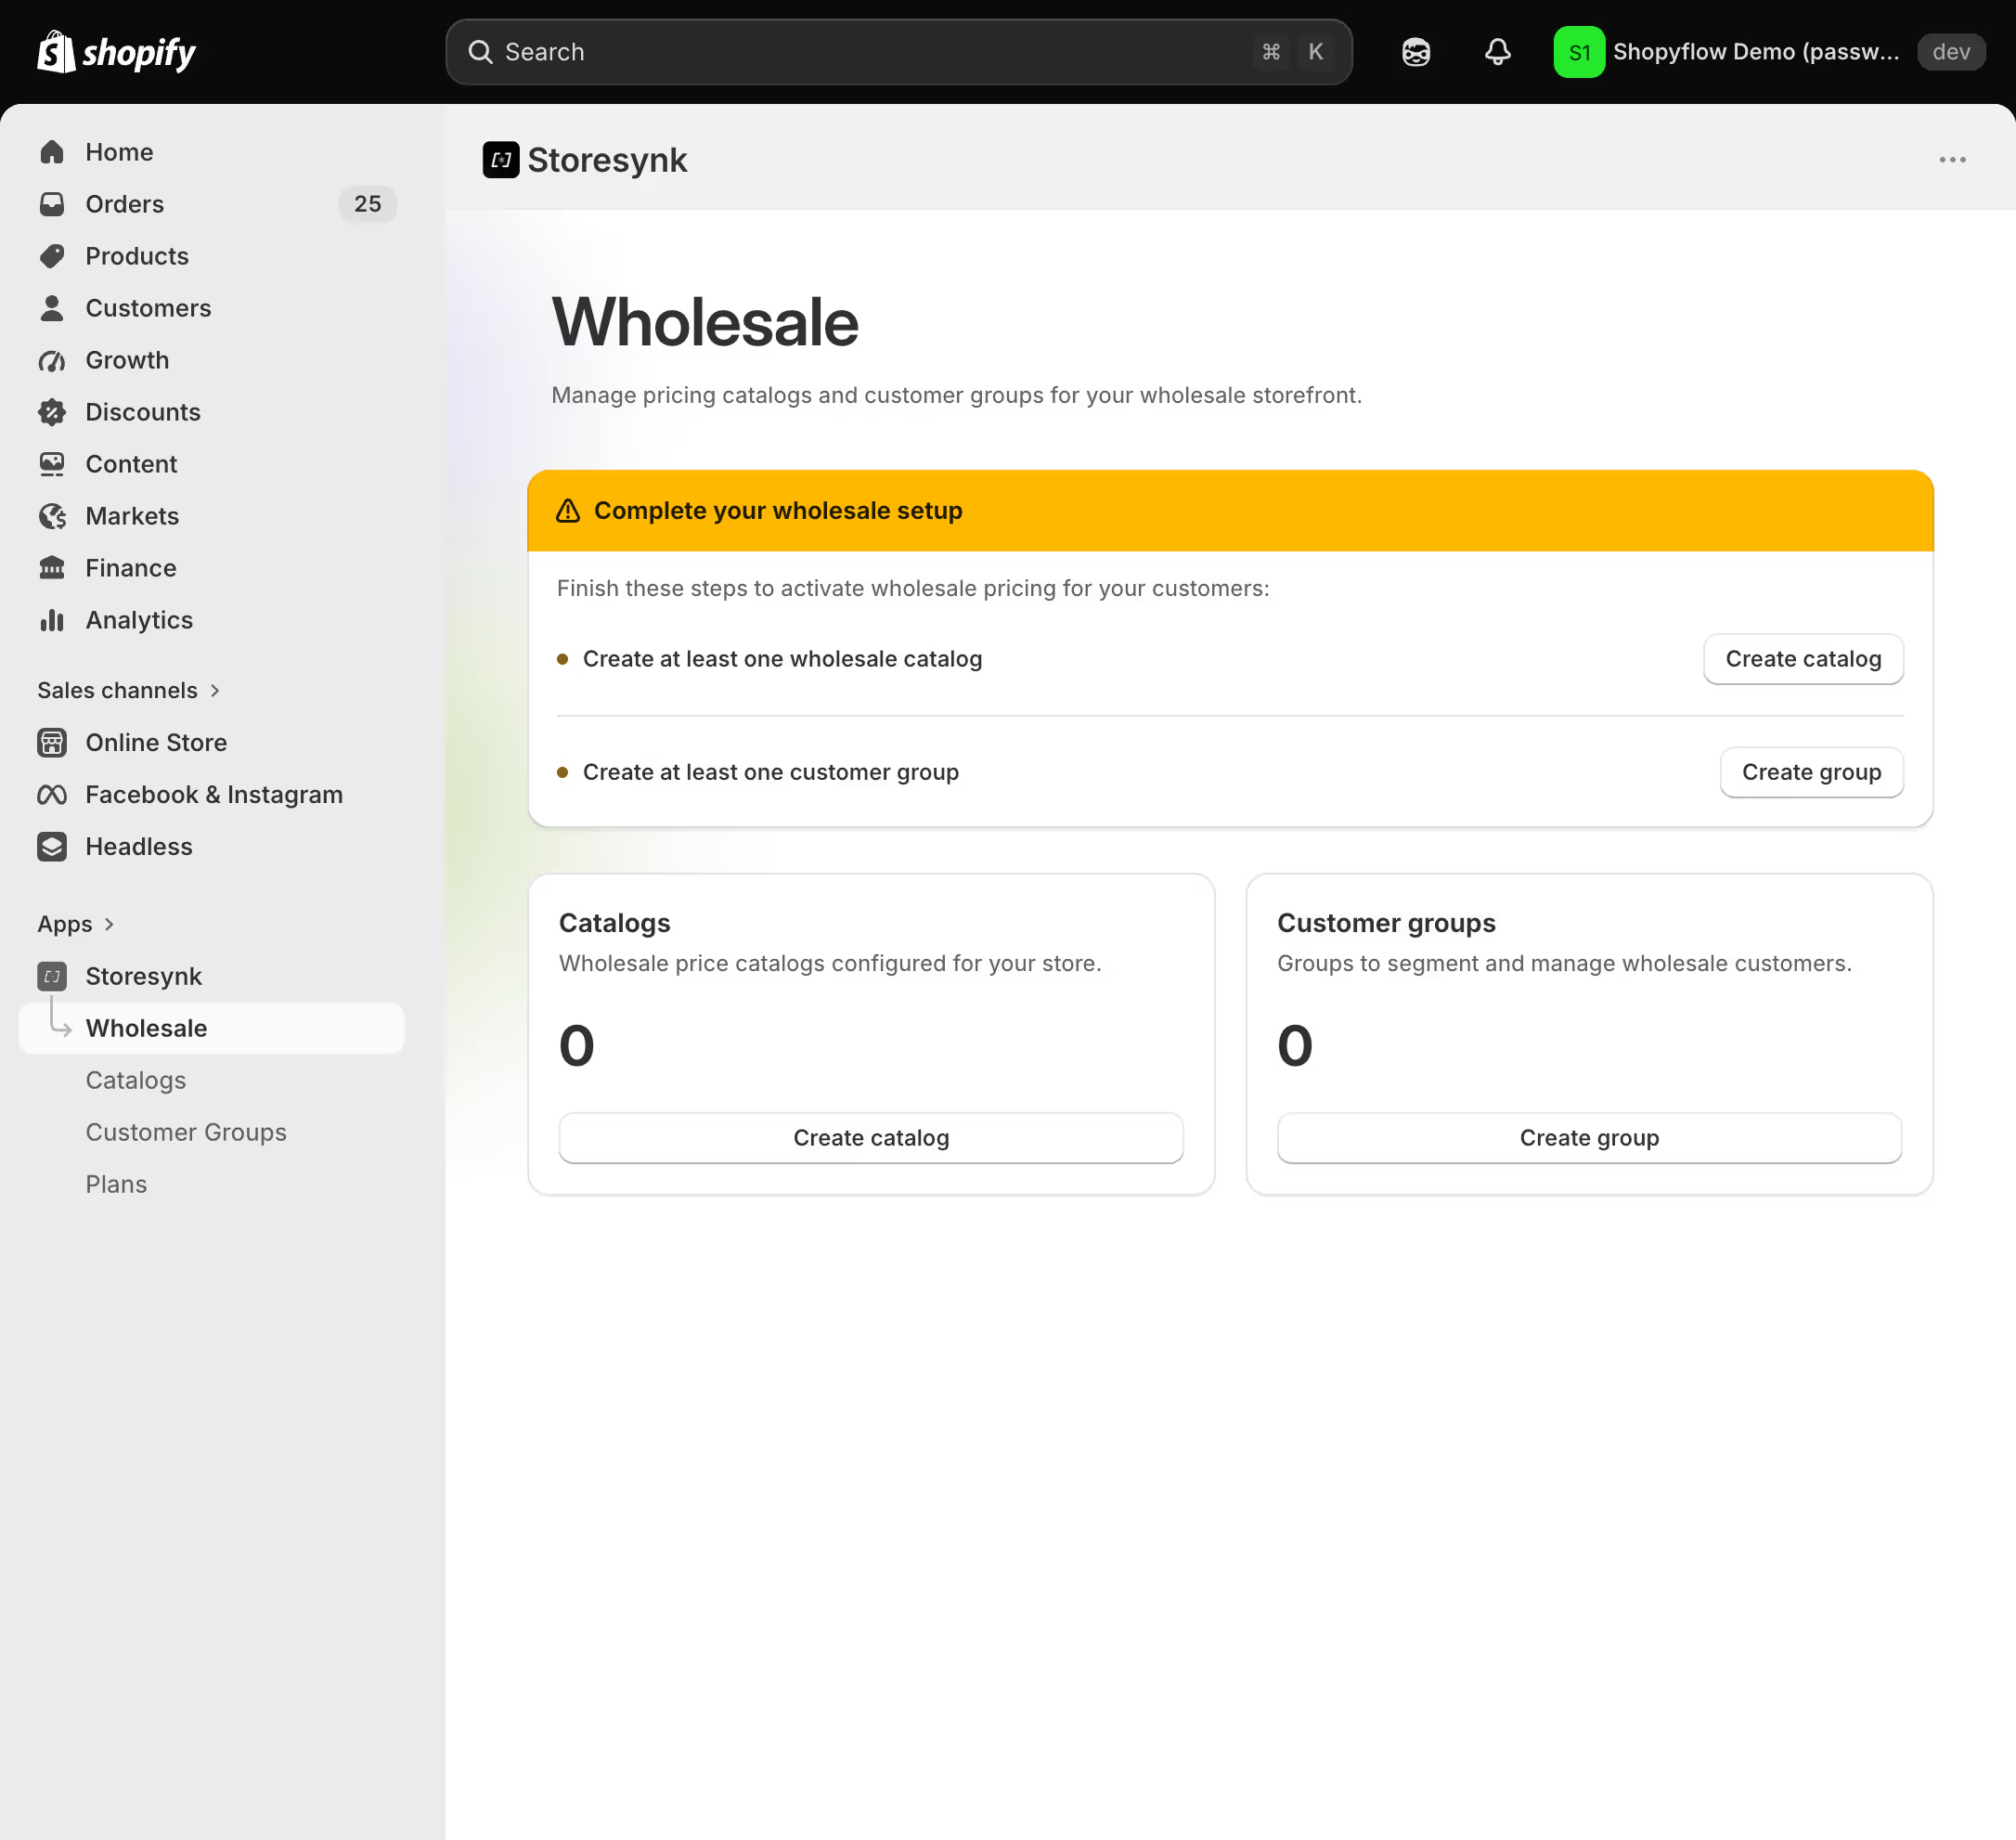
2. Click Create catalog. Name the catalog and optionally set a checkout discount label, shown next to discounted lines in the cart and checkout (defaults to "Wholesale price").
3. Set up the discount rules. Each rule picks its products with Applies to (all products, specific collections or specific products), applies a discount percentage and takes it off a pricing source: the current price or the compare-at price (RRP). Discounting from compare-at suits RRP-style pricing: keep the RRP in Shopify's compare-at field and buyers see their price next to it. Add more rules for different product groups.
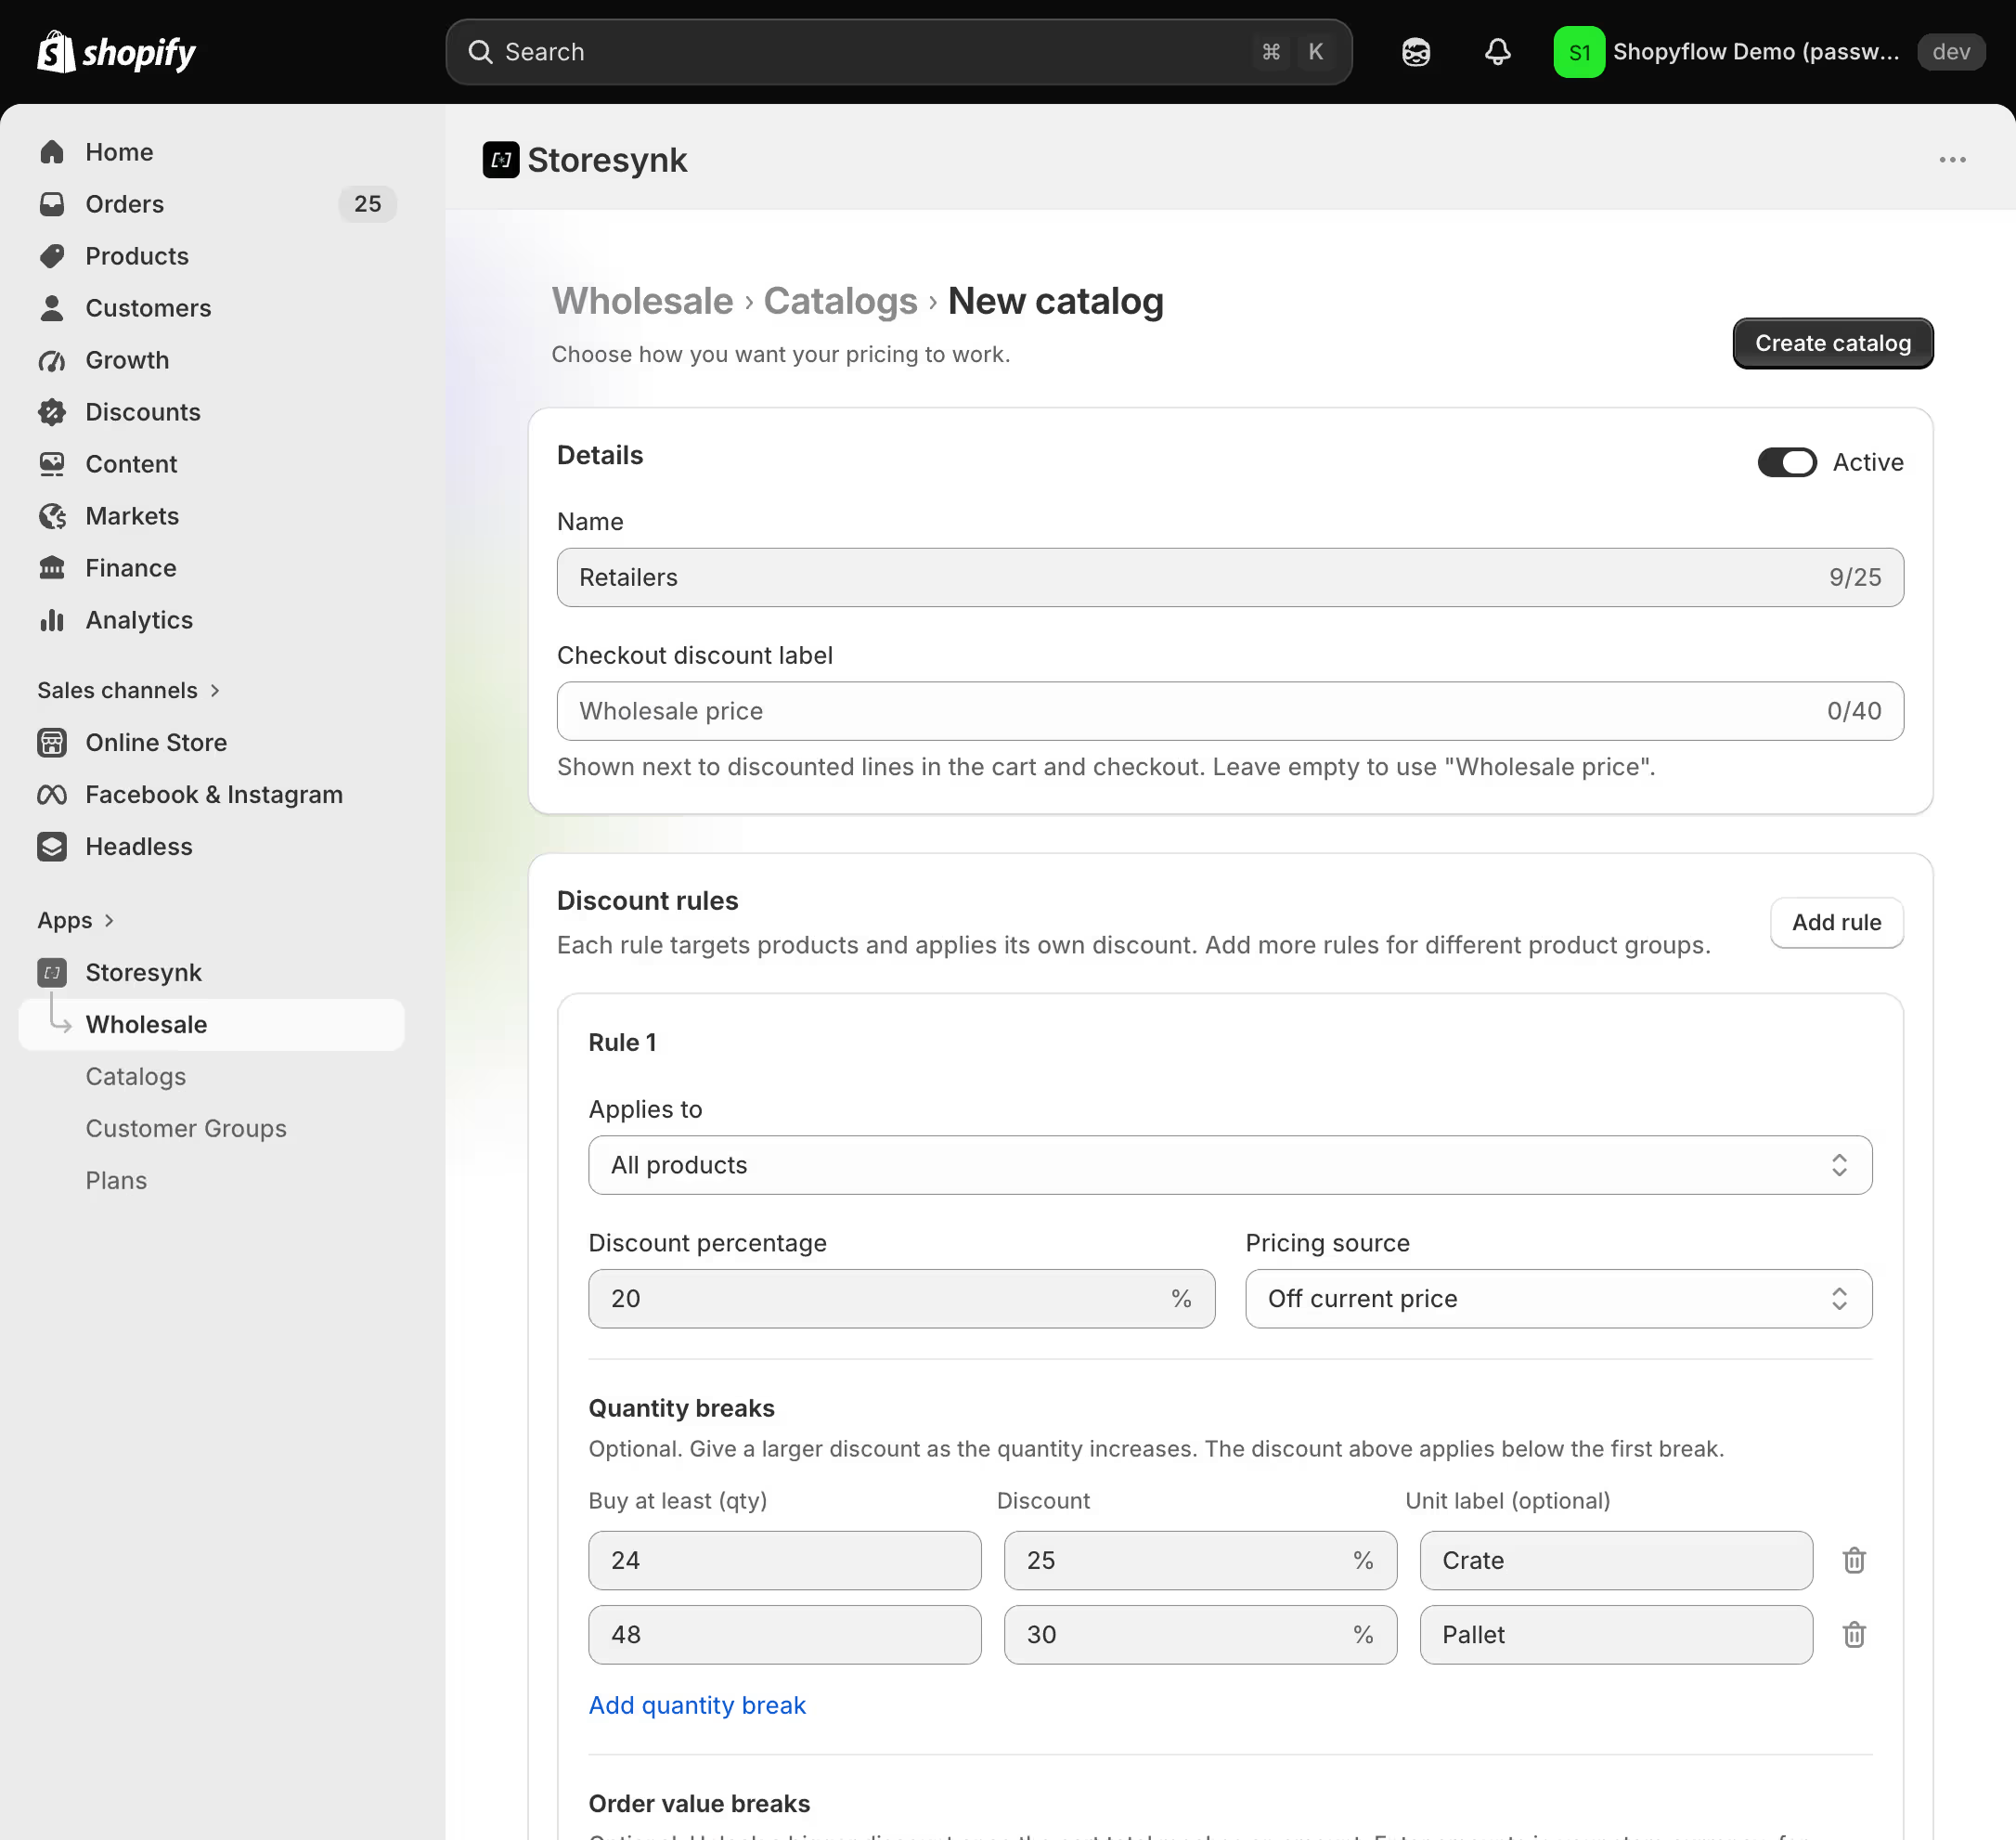
4. Optionally add quantity breaks to a rule. Each break unlocks a bigger discount from a minimum quantity upward and can carry a unit label, for example "crate". The volume pricing table in step ④ displays these labels. The rule's base discount applies below the first break.
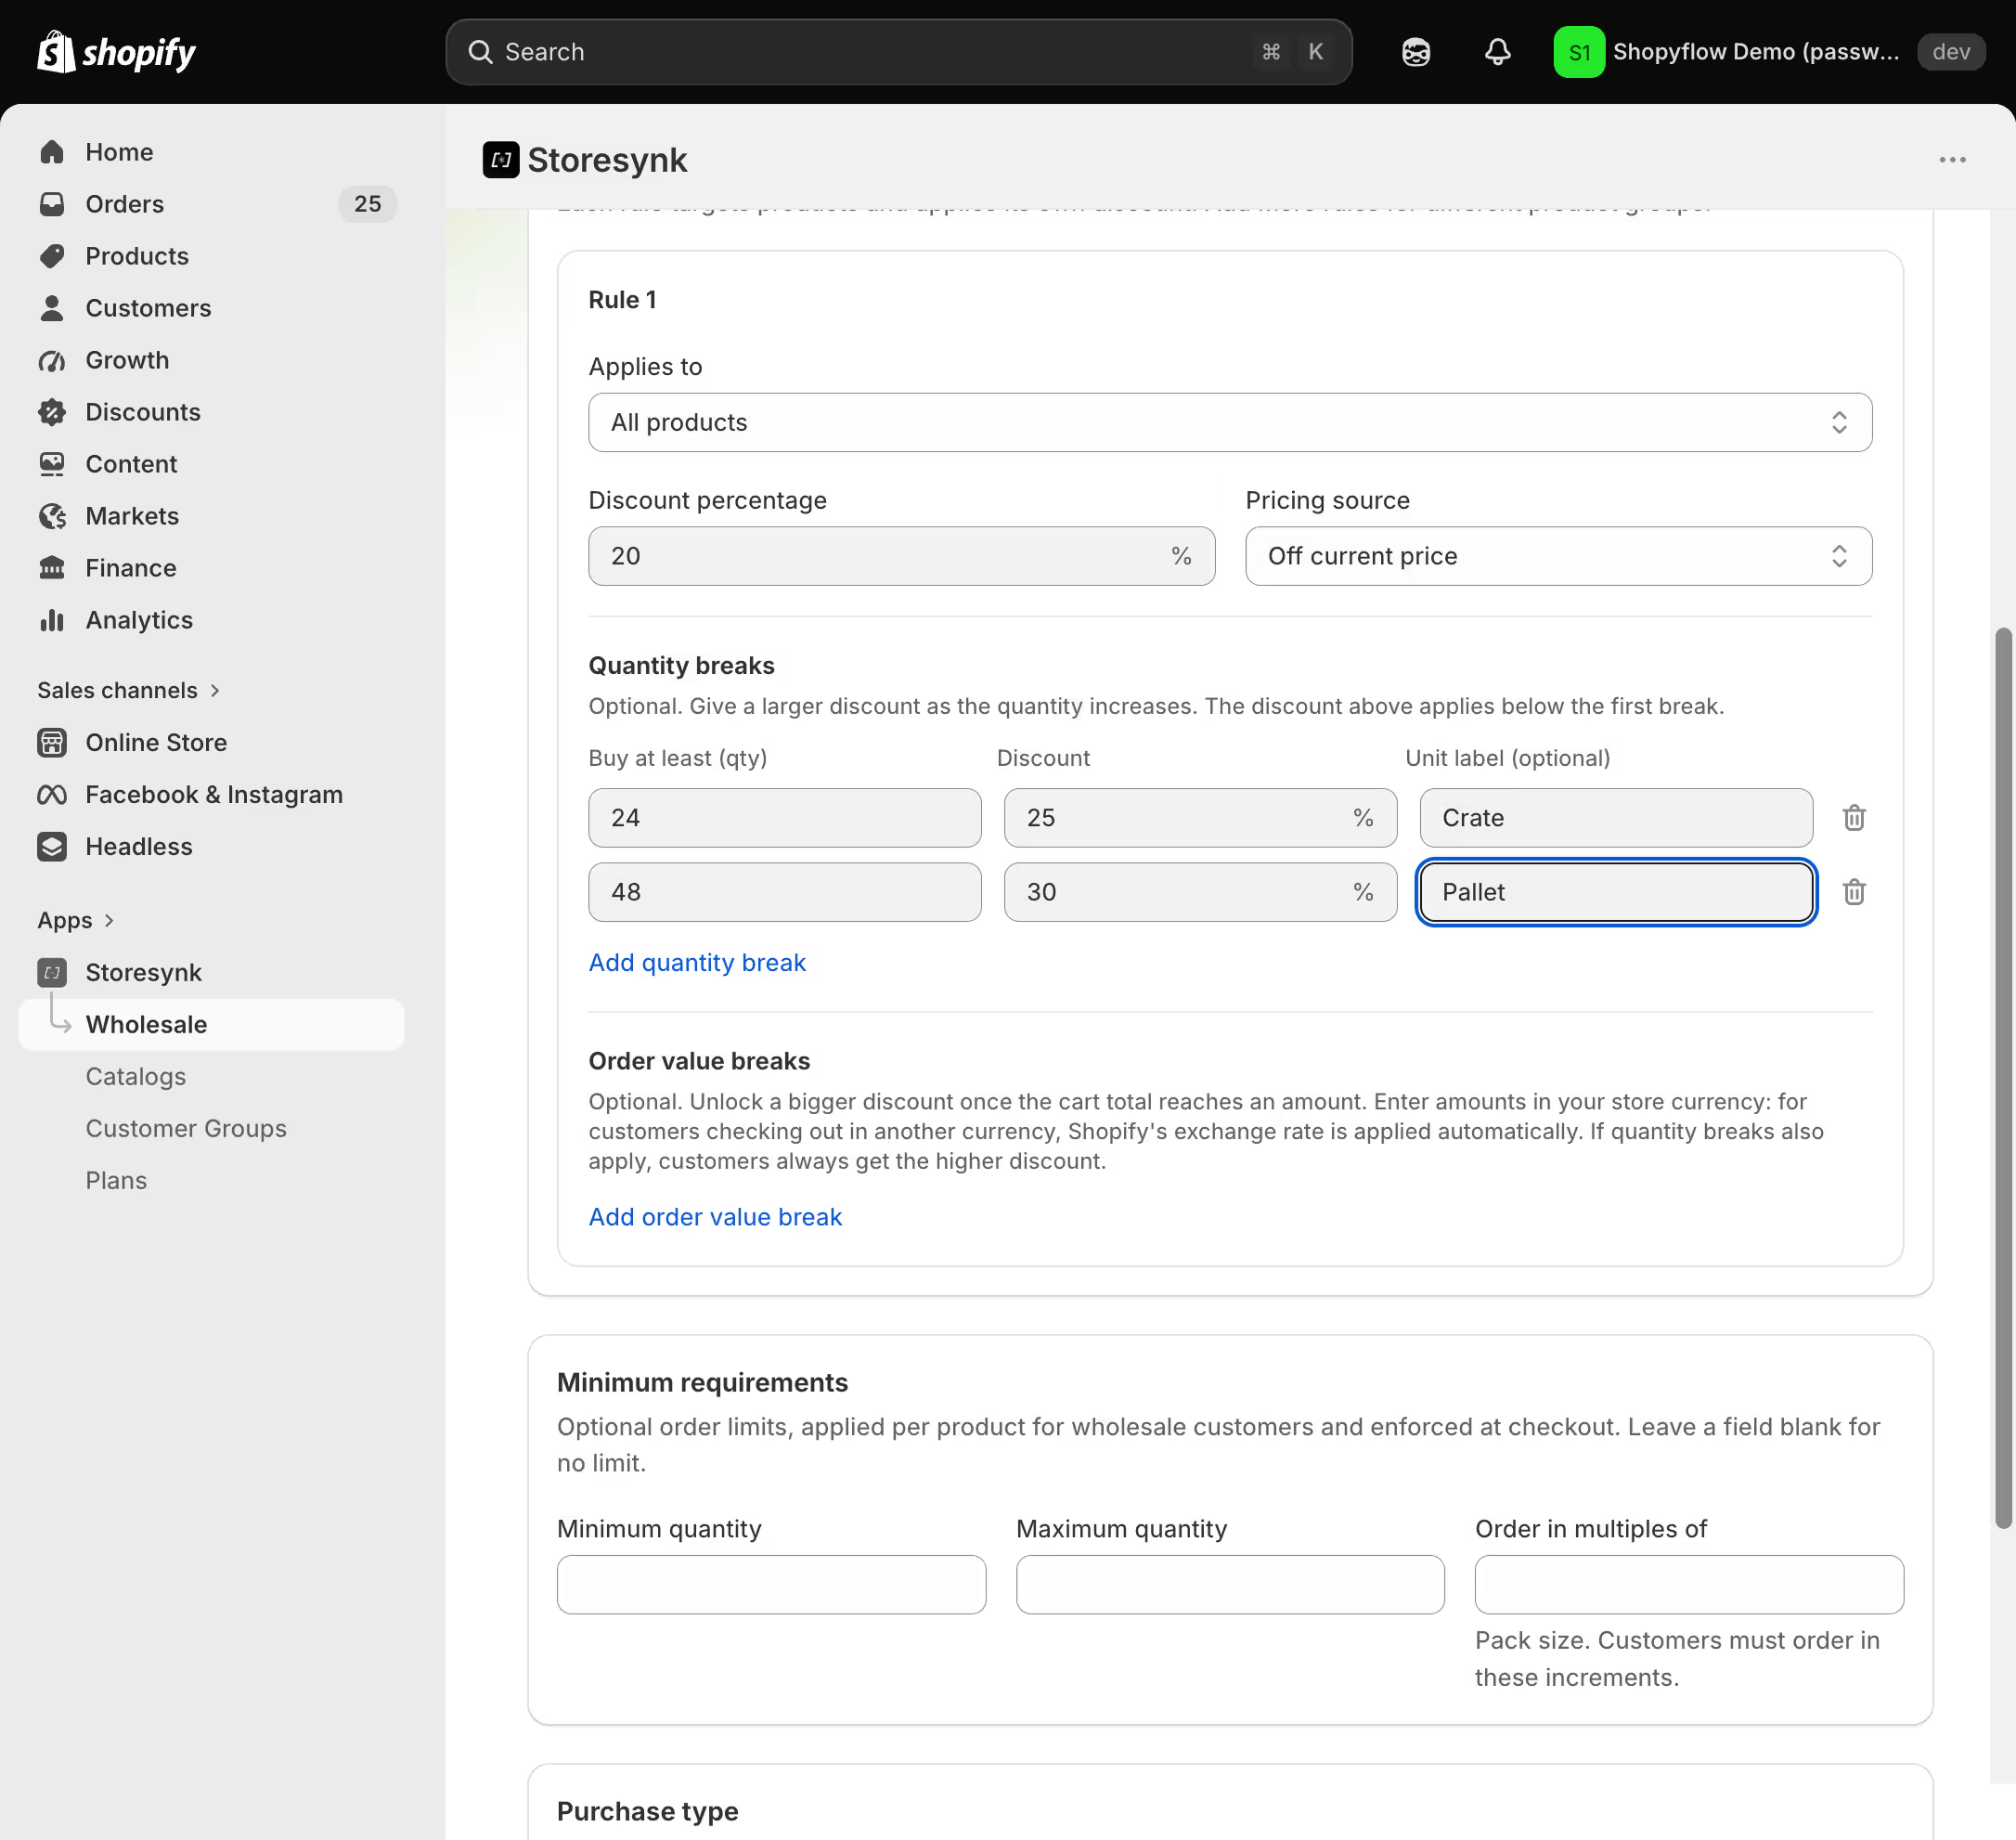
5. Optionally add order value breaks: a bigger discount once the cart total reaches an amount you set. Amounts are in your store currency and Shopify's exchange rate applies for other checkout currencies. When quantity breaks also apply, the customer gets the higher discount.
6. Optionally set minimum requirements: a minimum quantity, a maximum quantity or order in multiples of (the pack size). Limits apply per product across all its variants and are enforced at checkout with a clear message.
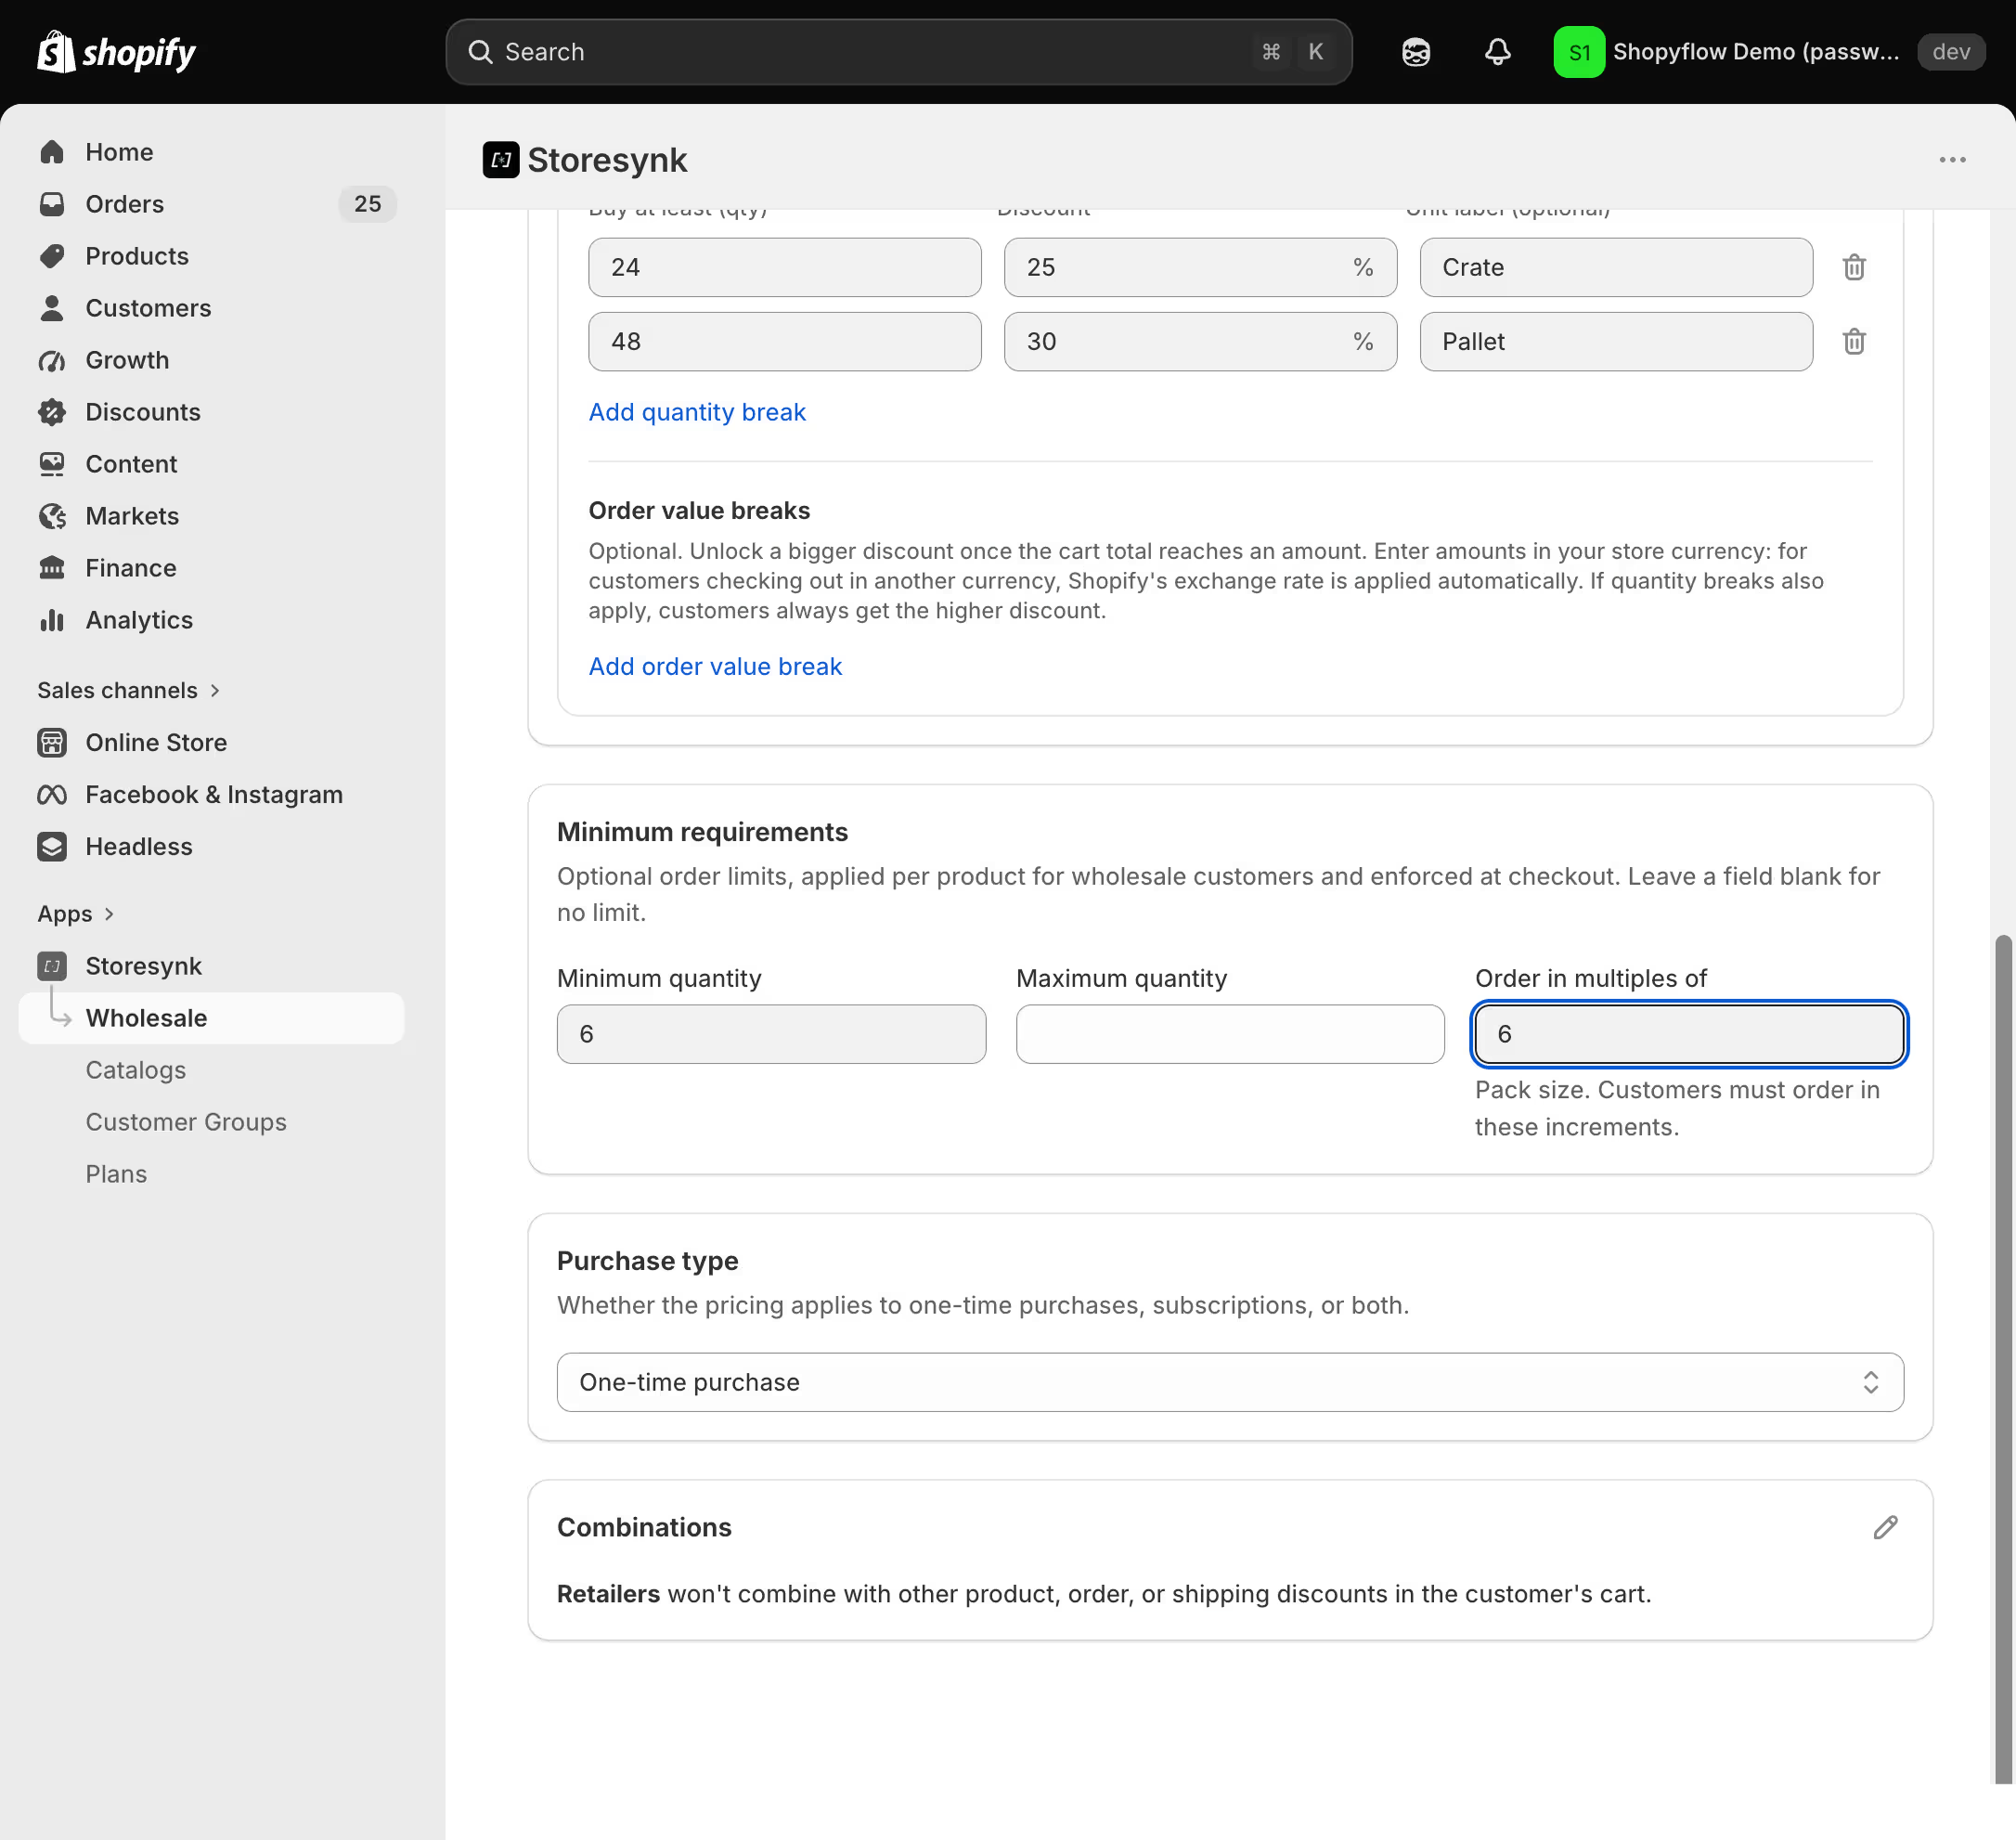
7. Make sure the catalog is Active and click Create catalog.
8. Go to Customer Groups and click Create group. Name the group for the kind of buyer, for example "Retailers". The tag derives from the name and is locked after creation. It is the Shopify customer tag that identifies members: approving an application in step ② adds it automatically, or add it to customers by hand in Shopify. Matching is case-insensitive.
9. Pick your catalog in the Catalog select. Members of the group receive the catalog's prices and each group receives one catalog.
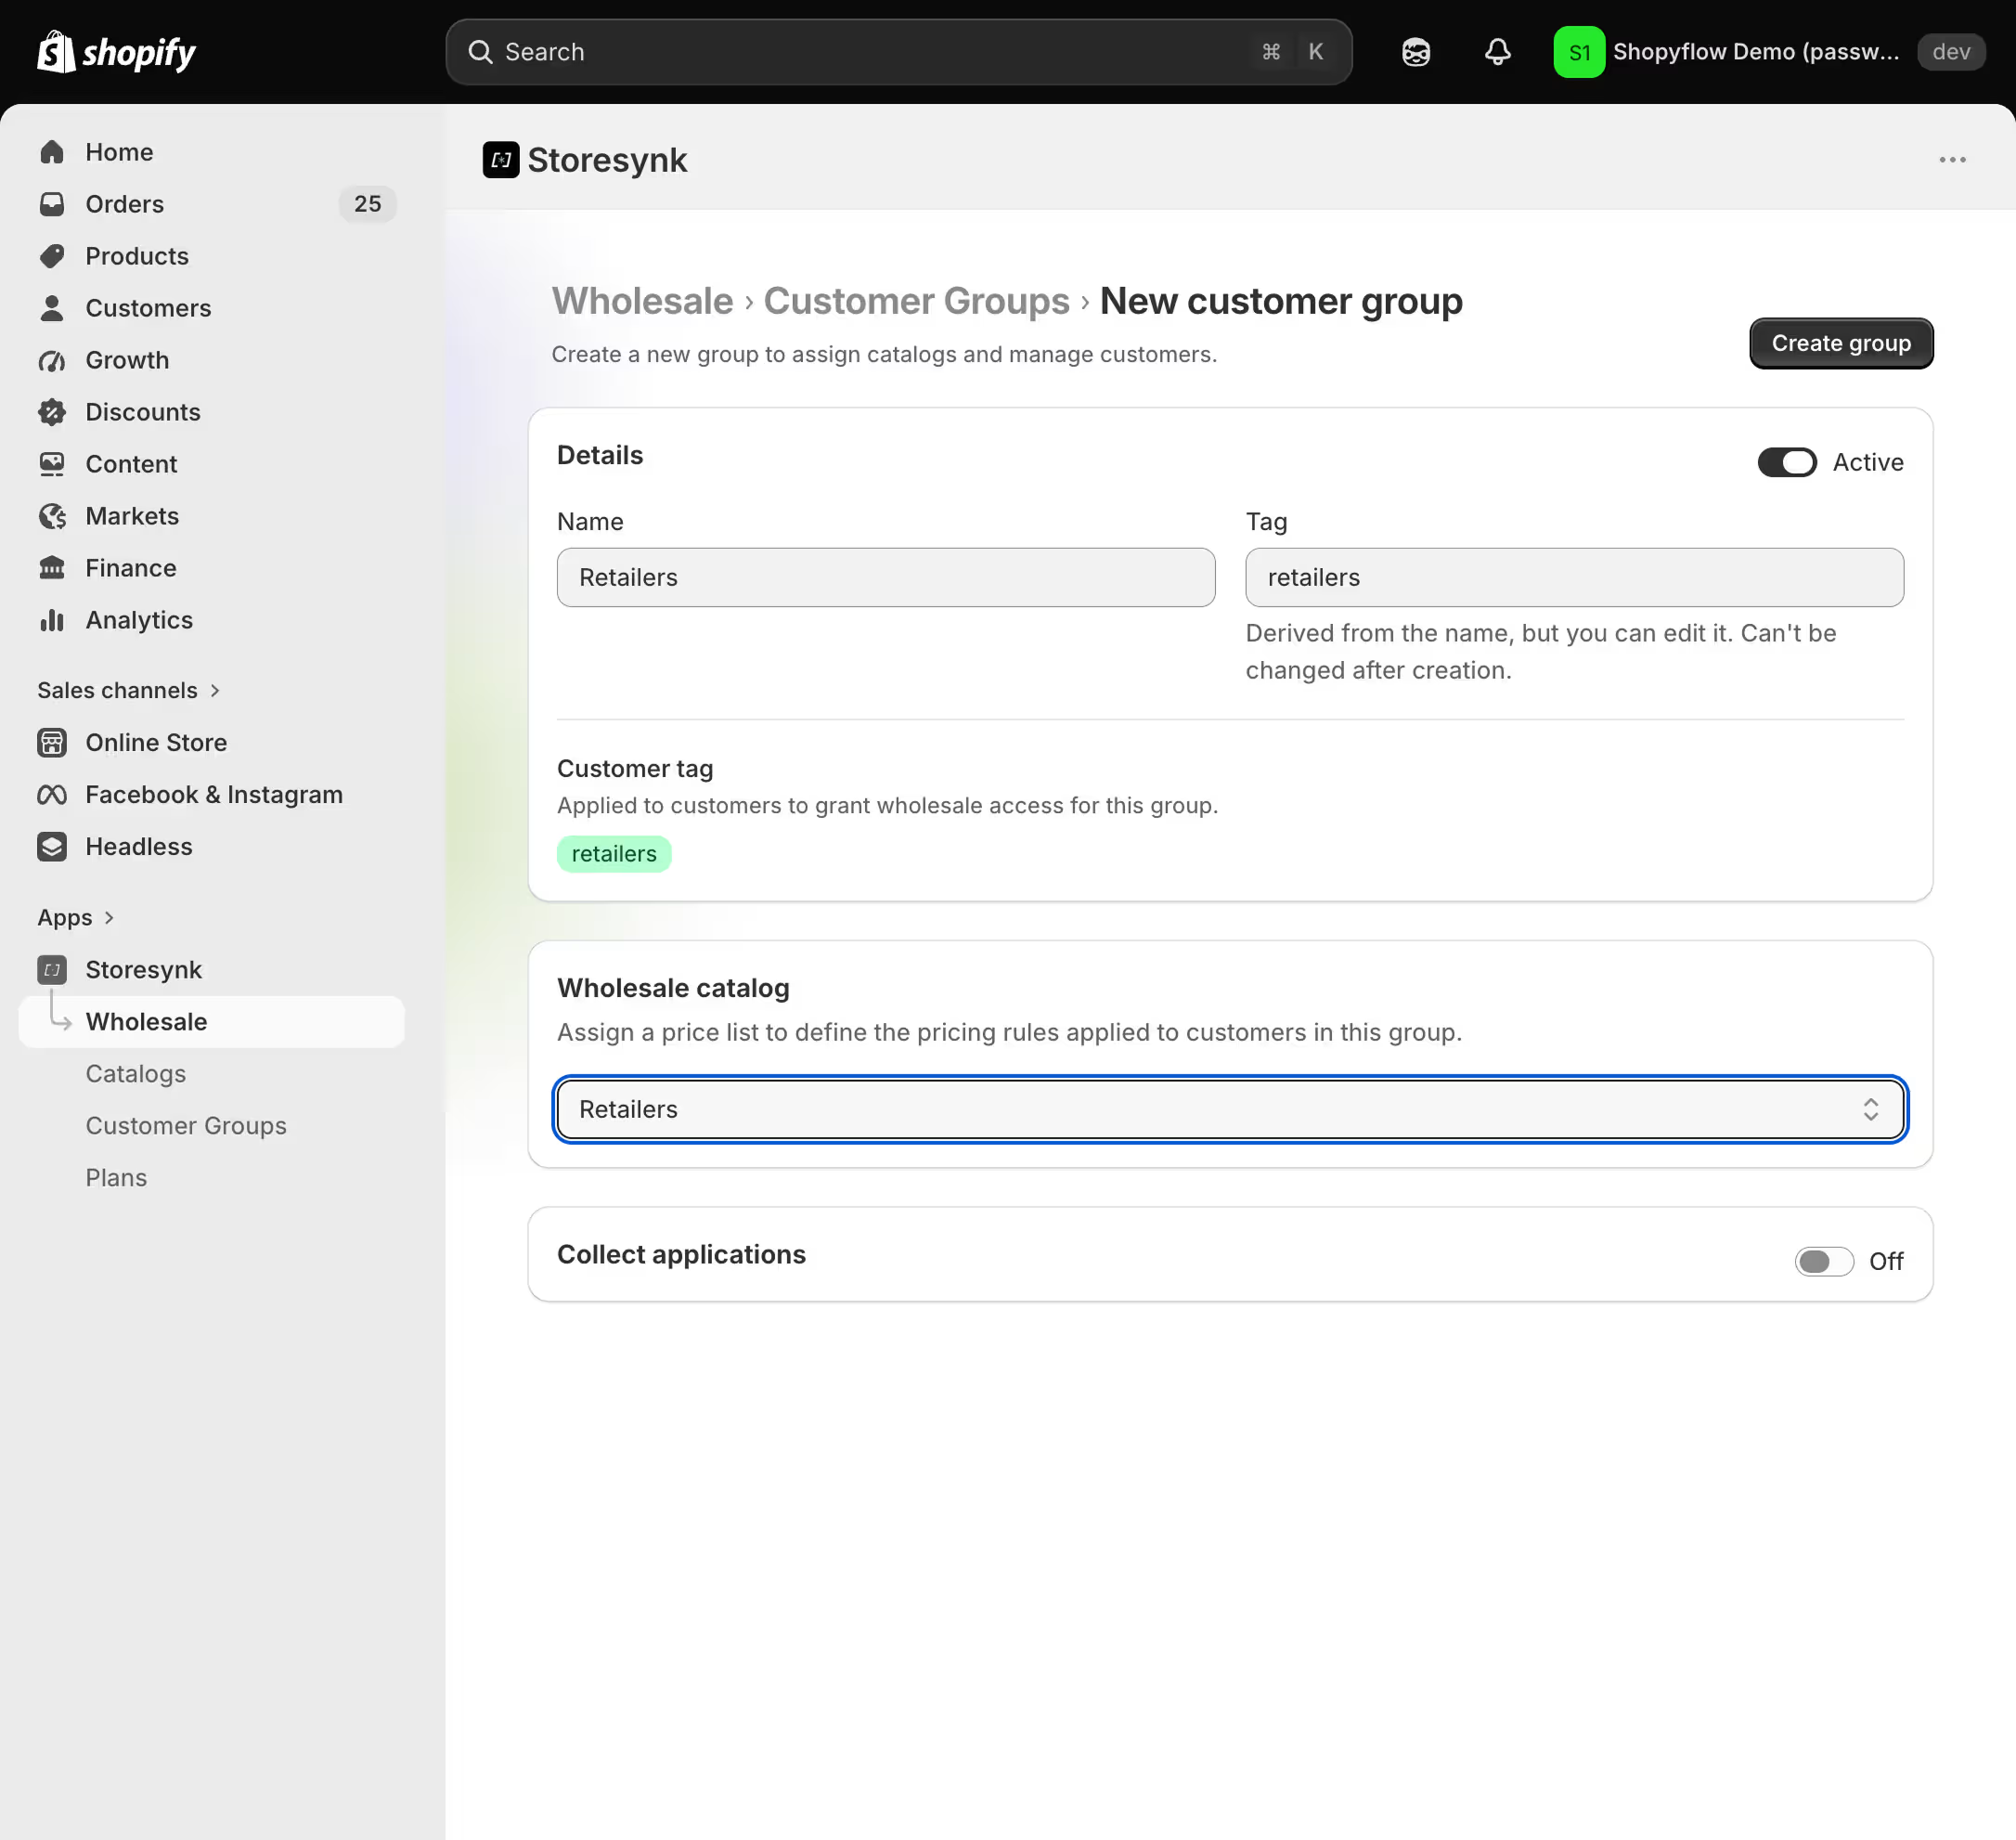
That is the whole pricing setup. When a customer with a group tag logs in on your site, Storesynk resolves their catalog and reprices the storefront.
② Add the wholesale application form
The wholesale application form lets prospective buyers apply from your Webflow site. You review and approve them per customer group in the Storesynk Shopify App.
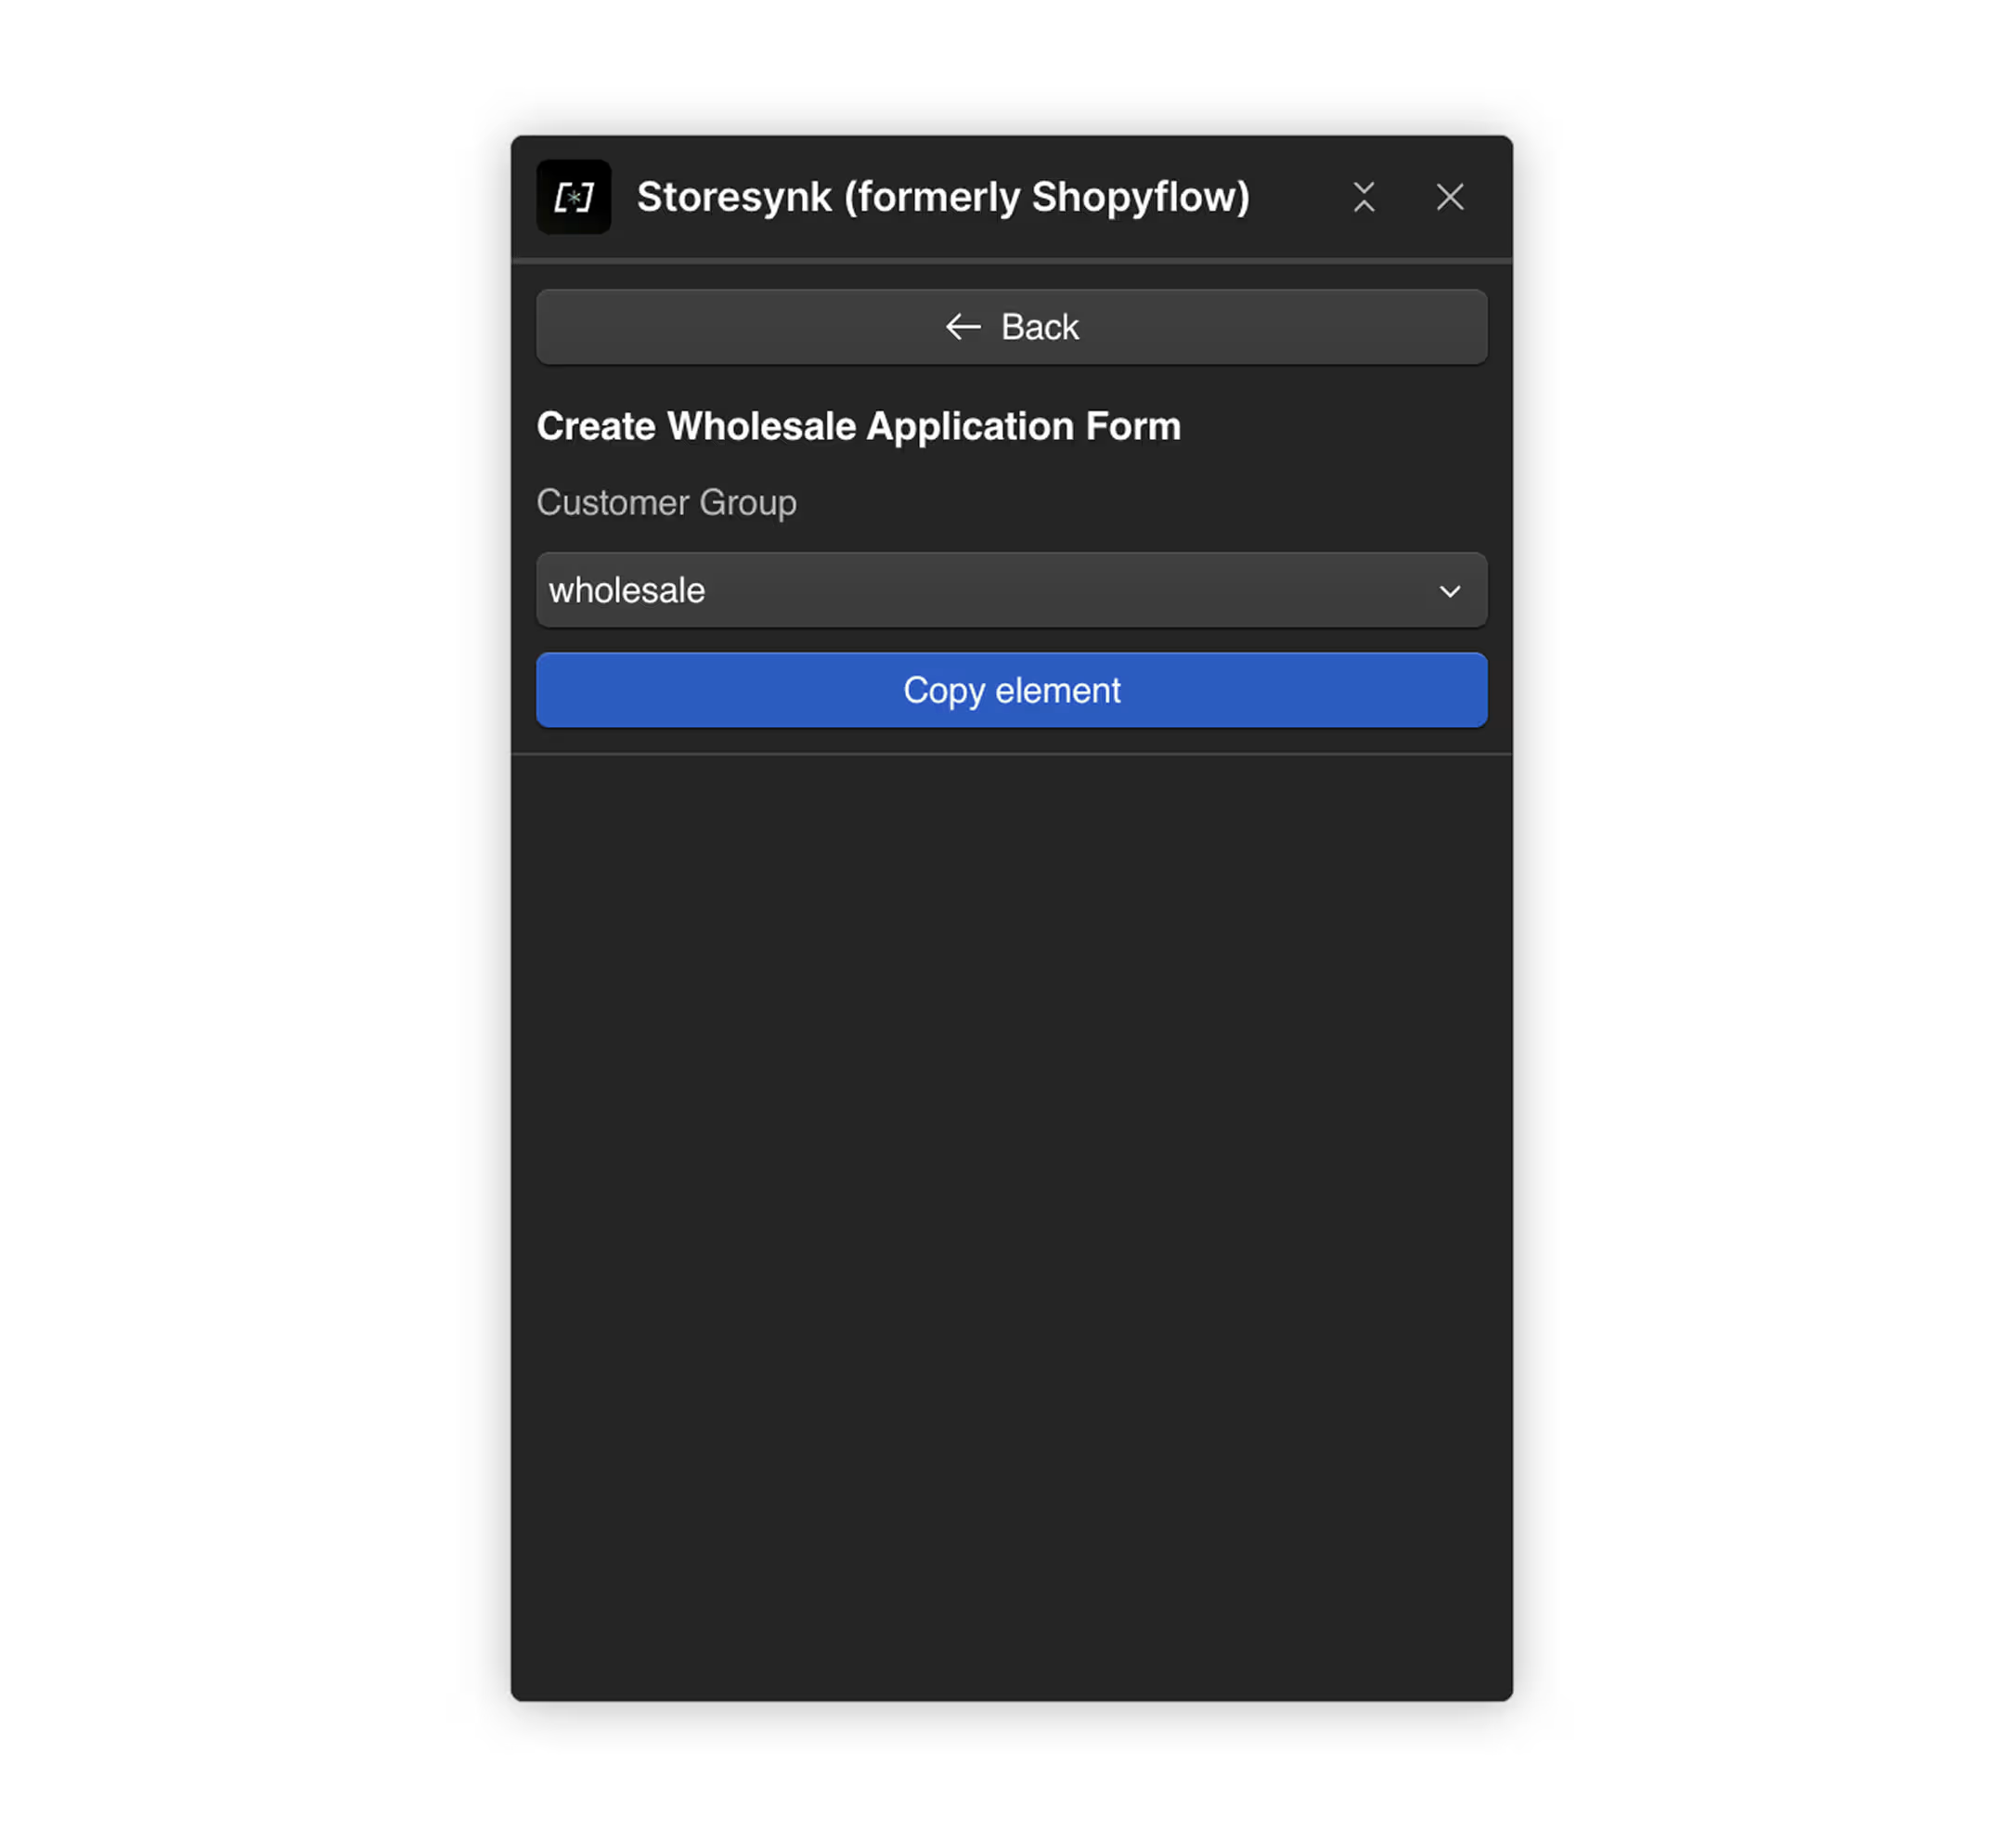
1. In the Webflow Designer, open the Storesynk Webflow App's Store Builder and add the Wholesale Application Form component to the page where applications should land, for example a "Become a stockist" page. It is a native Webflow form with the email field and submit button already wired up.
2. Pick the customer group in the component's settings. Applications submitted through the form land in that group's queue.
3. Customize the fields. The email field is prefilled and read only for logged-in customers; guests type theirs. Add anything your review process needs (company name, VAT number, expected order volume) as custom fields: each stores its answer under a property name you choose. A field named Company also shows next to each applicant in the applications list. Checkboxes store Yes or No and radio groups store the checked option's value.
4. Style the success and error messages like any Webflow form: select the form and switch to its success and error states in the Designer.
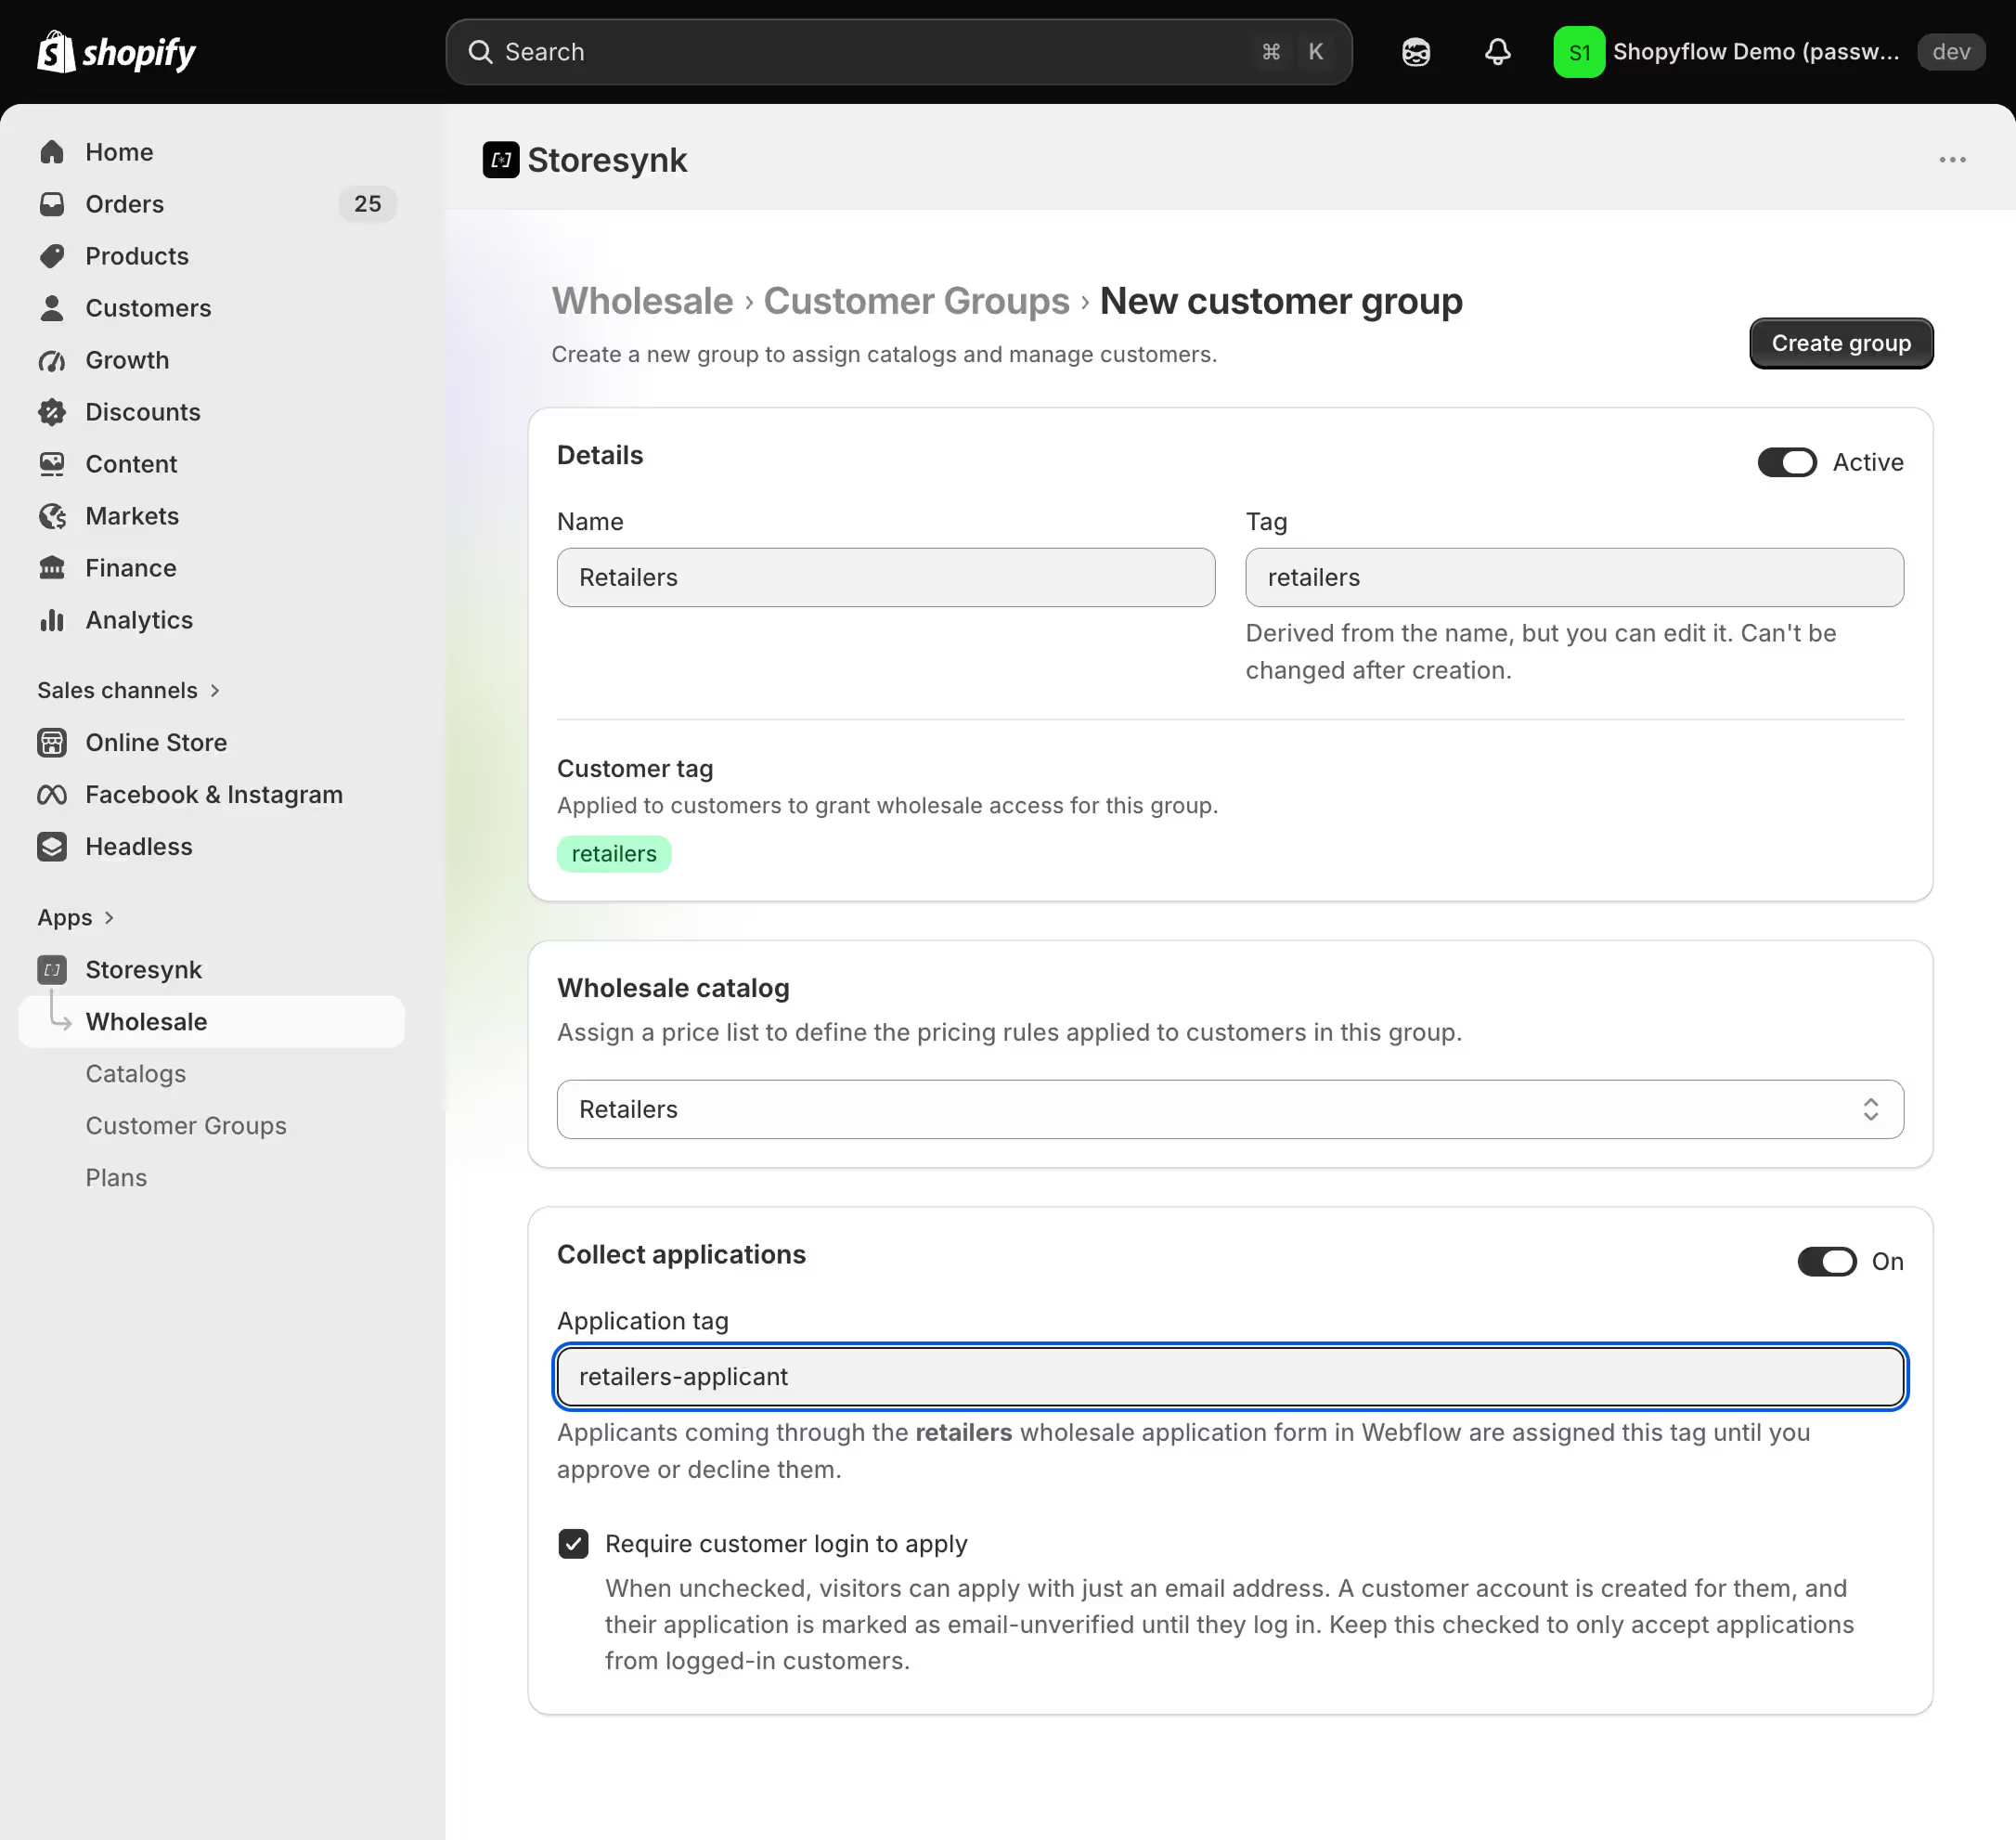
5. In the Storesynk Shopify App, open your group and turn on Collect applications. Set the application tag: applicants carry it until you approve or decline them. Require customer login to apply is checked by default, keeping every application linked to an existing customer account. Uncheck it to accept applications with just an email address; a customer account is created for the applicant and the application is marked email-unverified until they log in.
6. Publish your site and submit a test application.
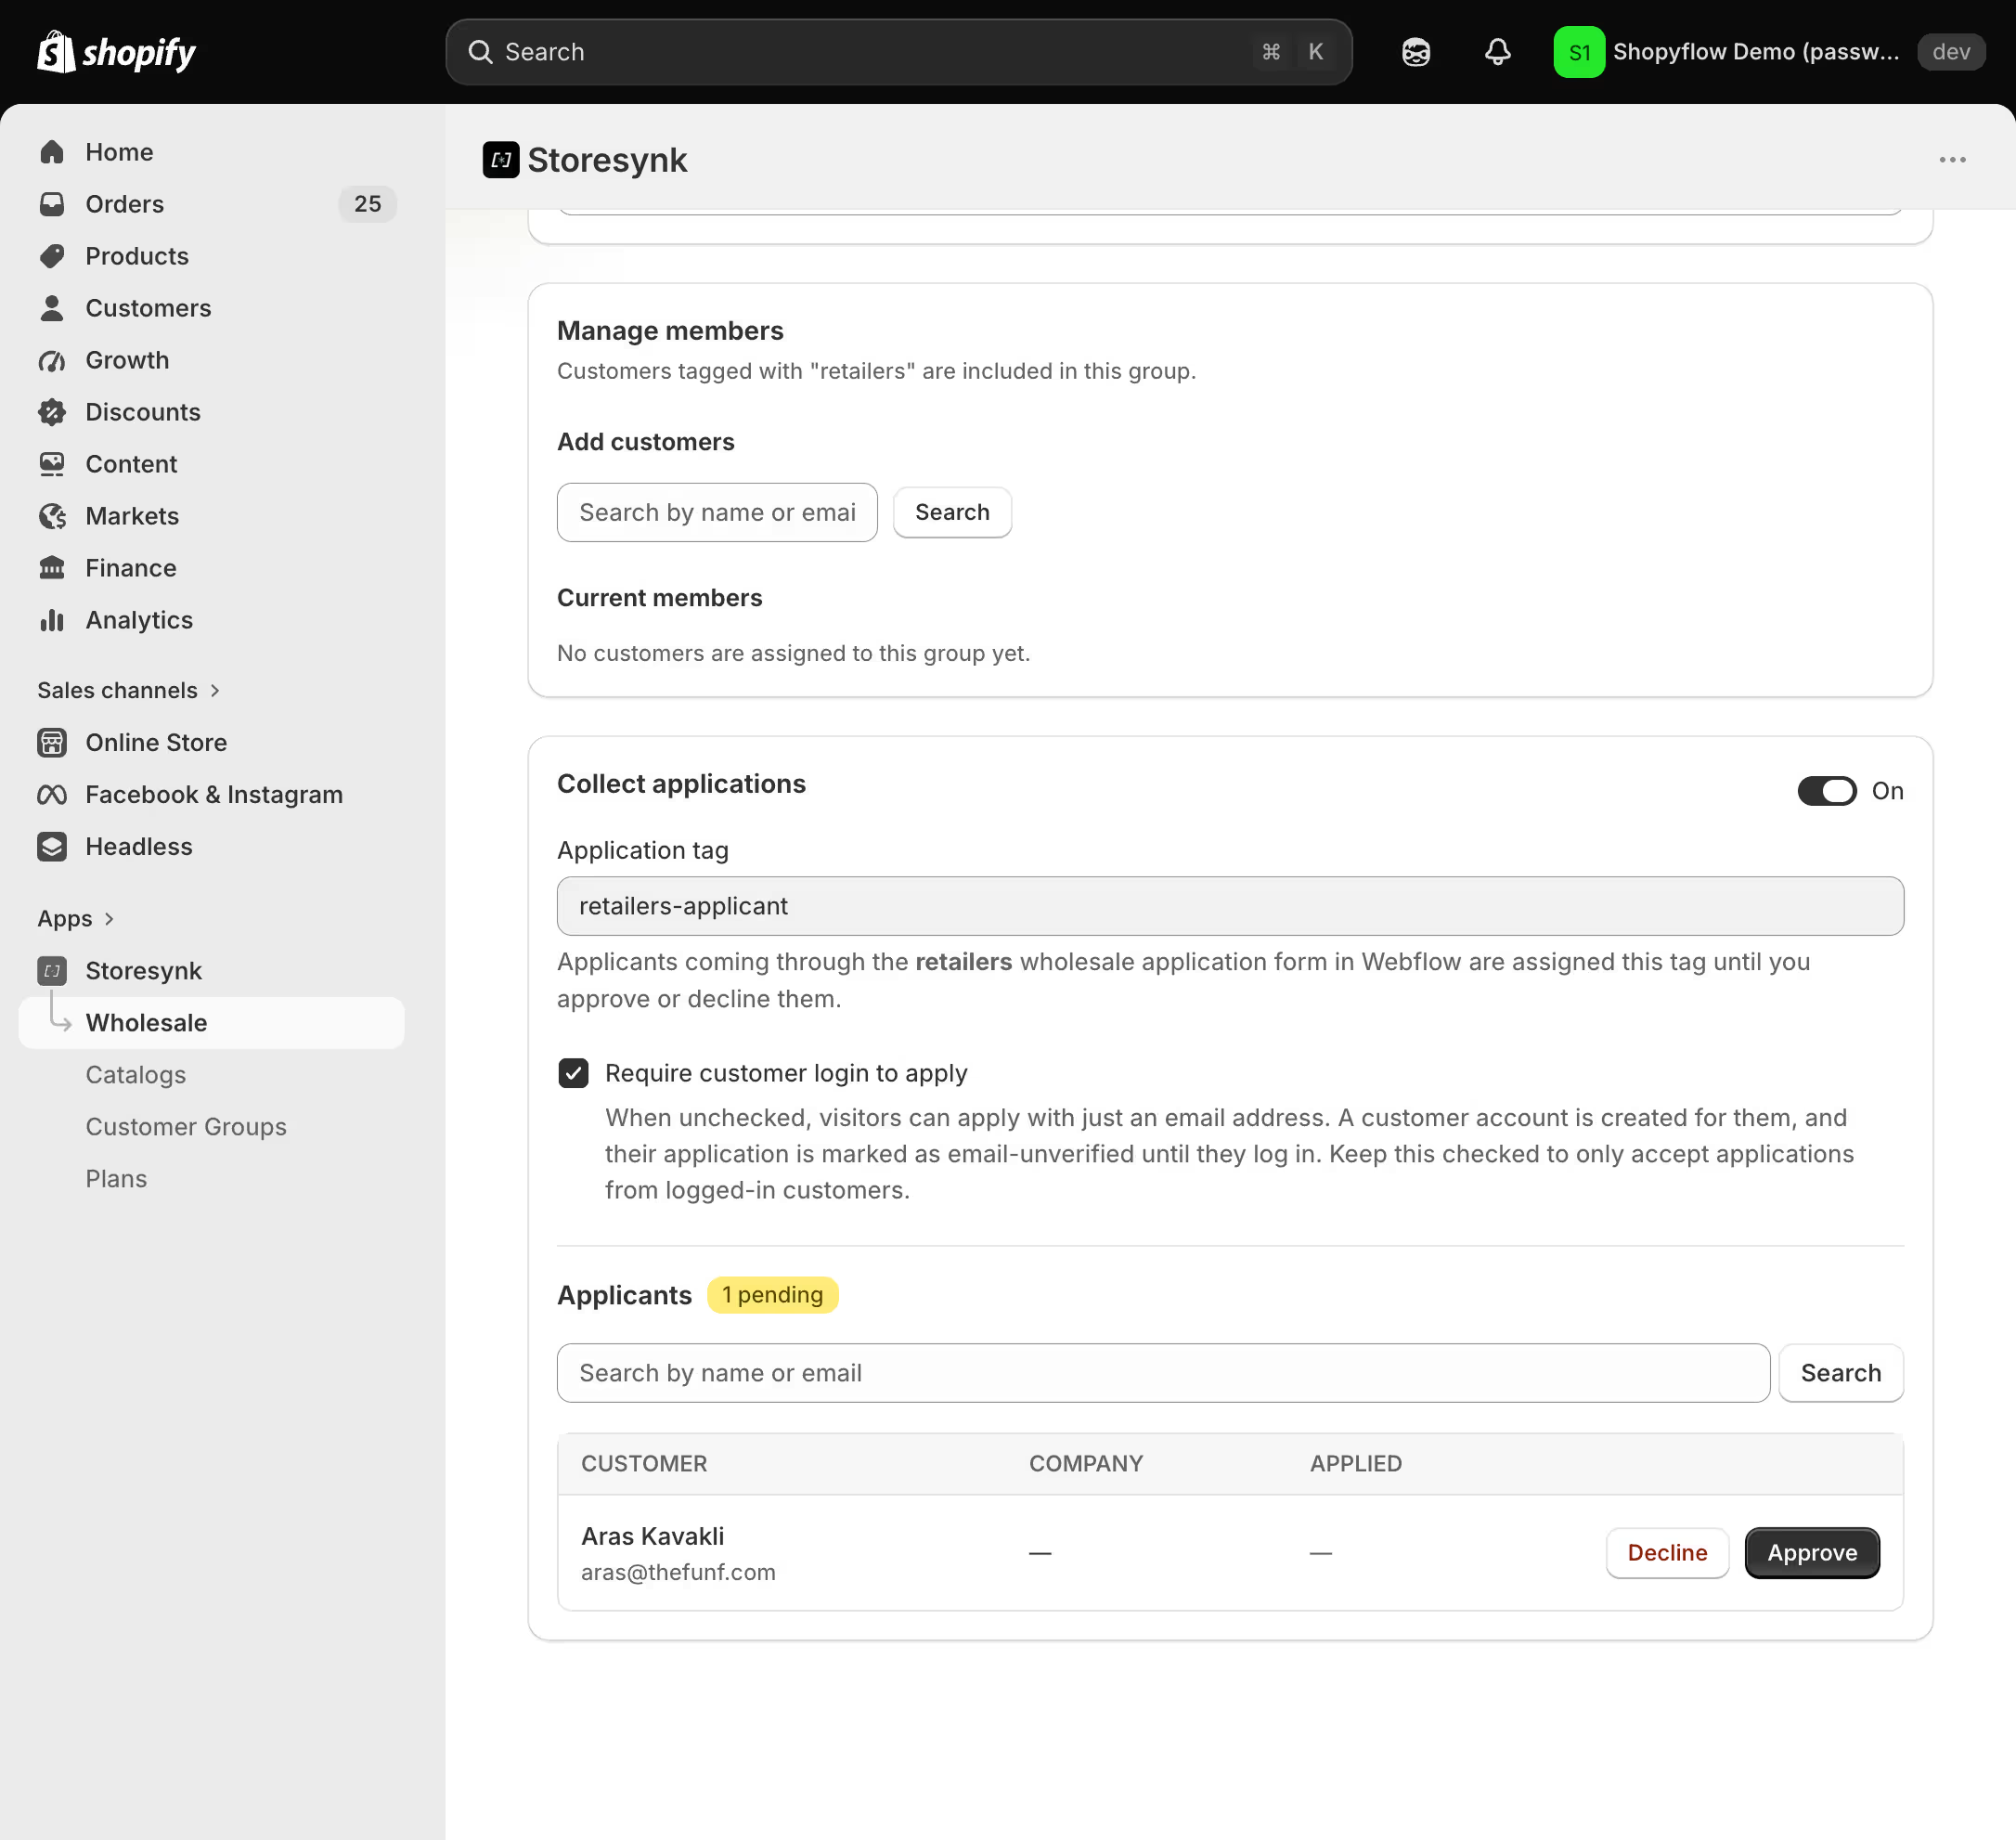
Review applications in the group's queue: open Customer Groups and choose View applications, or scroll to the pending applicants on the group page. Approving removes the application tag, adds the group's tag to the customer in Shopify and deletes the application data. From their next login the customer sees wholesale prices everywhere.
To build the form from scratch instead, the Wholesale Application Form reference covers every part, including the submit button and email field.
③ Show wholesale prices on your product pages
With a catalog live and customers tagged, wholesale prices already flow into your standard Price elements, the cart and checkout. The Wholesale Price Info widget adds a dedicated price block showing the customer's price, the price they are discounted from and their saving. It only renders for logged-in wholesale customers.
1. From the Store Builder, add the Wholesale Price Info component inside your Product Container, next to your existing price block.
2. The component comes with three displayers you can keep, restyle or delete:
- The Wholesale Price Displayer renders the customer's wholesale price.
- The Wholesale Compare Price Displayer renders the price they are discounted from (the RRP or the regular price, depending on the rule). It hides when there is no compare price.
- The Wholesale Savings Displayer renders the saving, as a percentage by default or as money saved. Its reference covers the options.
3. Labels like "Your price" or "RRP" are plain text. Edit them like any text element; Storesynk only fills the displayers.
4. Hide your standard price while wholesale pricing is active: add Wholesale Hide to your regular price block. Retail visitors see your normal prices and wholesale customers see theirs.
5. Publish, log in with a tagged test customer and check a targeted product page.
Wholesale prices respect your store's currency and formatting settings. To adjust them, see How to change your price and currency formatting in Webflow.
④ Add volume pricing tables
If your catalog has quantity breaks, a volume pricing table shows buyers what larger orders unlock. It hides for non-wholesale visitors and on variants with no tiers.
1. From the Store Builder, add the Wholesale Volume Pricing component inside your Product Container, usually below the price info block from step ③.
2. Design one template row, the Wholesale Volume Pricing Item; Storesynk clones it for each tier. Inside the row you can use:
- The tier quantity displayer. A tier label from the catalog (like "Crate") shows here instead of the raw quantity.
- The tier price displayer for the per-unit price.
- The tier compare price displayer for the pre-discount price.
- The tier discount displayer for the tier's discount.
3. Style the template row once; every tier inherits it. Delete any displayer you do not want.
4. For zero setup, delete the template row instead. Storesynk injects a default table you can restyle from your site CSS; the Wholesale Volume Pricing reference covers the styling hook.
5. Publish and check a product with tiers as a wholesale customer.
The Wholesale Volume Pricing reference documents the full element tree, from the list and item down to each displayer.
⑤ Show and hide content for wholesale customers
Beyond prices, wholesale stores usually need gated content: a "Wholesale hub" link for stockists, an "Apply for a wholesale account" banner for everyone else. Storesynk's visibility attributes handle this with tag values.
You may know sf-auth and sf-unauth from How to hide elements when user is logged out. Both accept a customer tag as their value:
sf-auth="wholesale"shows the element only to logged-in customers carrying thewholesaletag.sf-unauth="wholesale"shows the element to everyone else: guests, retail customers, anyone outside the group.
Use your customer group's tag from step ① as the value.
A classic pattern for the application page from step ②: wrap the "Apply for wholesale" call to action in sf-unauth="wholesale" and the wholesale hub (or a "You already have wholesale access" message) in sf-auth="wholesale". Approved customers stop seeing the pitch and start seeing their prices, on the same page.
⑥ Cart, checkout and finishing touches
Checkout needs no setup. When a wholesale customer is logged in, Storesynk attaches their identity to the cart, so Shopify applies the same wholesale discount at checkout that the customer saw on your site. The Add to Cart Button, cart and checkout work exactly as they do for retail customers, just at wholesale prices.
The catalog's order rules from step ① land at checkout too. Crossing an order value threshold applies the deeper rate automatically. A quantity outside the catalog's limits (below the minimum, above the maximum or off the increment, counted across the product's variants) blocks the order with a clear message. Consider stating your limits near the quantity selector so buyers know them earlier.
Two finishing touches:
No flash on first paint. Storesynk keeps the wholesale widgets hidden until it knows what the visitor should see, so nothing flashes while prices load. When ready, it stamps the _sf-wholesale-ready attribute on the body element as a hook for a custom loading treatment. No setup needed.
Logout just works. When a wholesale customer logs out, or you revoke their access, prices and every wholesale widget revert to the retail state without a reload.
Publish your site. Buyers apply on your site, you approve them in the Storesynk Shopify App and from their next login they shop your Webflow store at their own prices.
Troubleshooting
Wholesale prices never appear. Wholesale pricing requires the callback login flow. Without it, Storesynk never receives the session on your site and cannot tell who is logged in. Set it up via How to use passwordless Shopify customer accounts in Webflow with Storesynk.
A tagged customer sees retail prices. Check that the customer's tag in Shopify matches the group's tag. Matching is case-insensitive, but a typo or extra space will not match. Confirm the group is active with the catalog assigned, the catalog is active and one of its rules covers the product.
A customer was approved but still sees retail prices. Approval adds the tag immediately, but a customer who was already logged in needs to log in again to pick up their new status.
Catalog changes do not show up right away. Wholesale prices are cached for the session. Have the customer log out and back in to see updated pricing.
A widget is invisible. Usually correct behavior: every wholesale widget hides for visitors without wholesale access and the volume pricing table also hides on variants with no tiers. Test logged in with a tagged customer on a targeted product before assuming something is broken.
