
How to Use Passwordless Shopify Customer Accounts in Webflow with Storesynk
Storesynk supports Shopify's new Customer Account API, offering a secure and streamlined login experience without the need for passwords.
Customer accounts is the newest version of customer accounts, and lets your customers sign in using a one-time 6-digit verification code sent by email. A password isn't required to sign in.
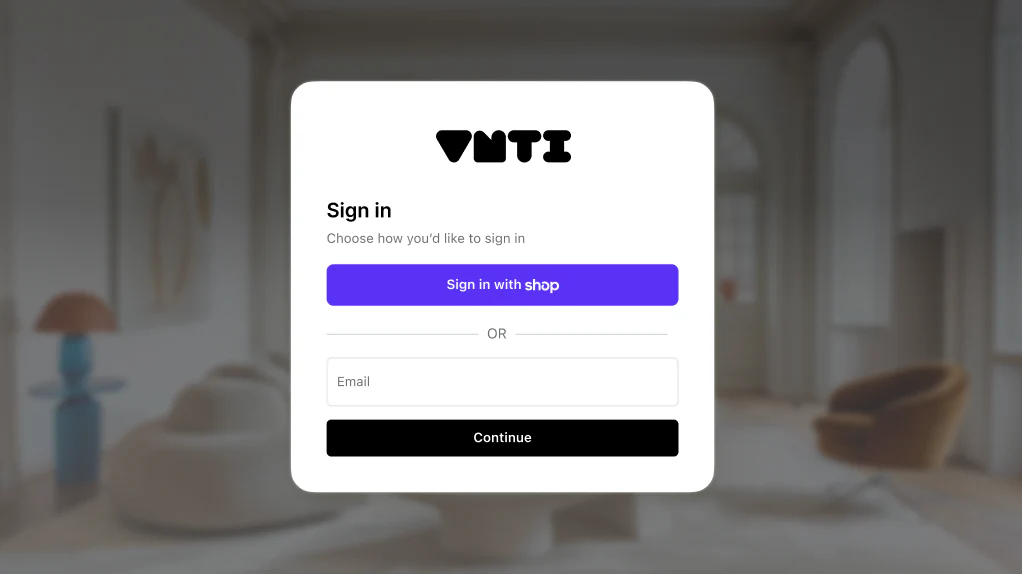
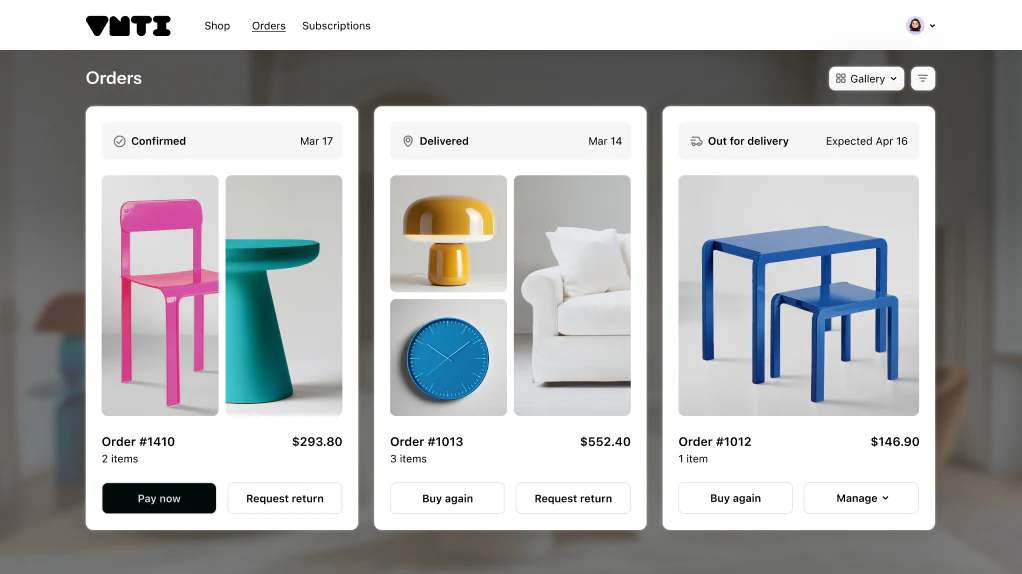
Your customers can view their orders, update their payment methods and manage their subscriptions in the new Shopify customer portal. If you prefer, you can also build the customer portal in Webflow using Storesynk's account components (with some missing features like payment and subscription management).
In this guide you are going to understand:
- How to enable new Customer Accounts in Shopify
- How to configure your Webflow site to work with Shopify's passwordless login
- How to enable customer-only content in Webflow: gated pages, tag-based visibility and wholesale pricing
① Verify customer accounts version in Shopify
- Log in to your Shopify Admin
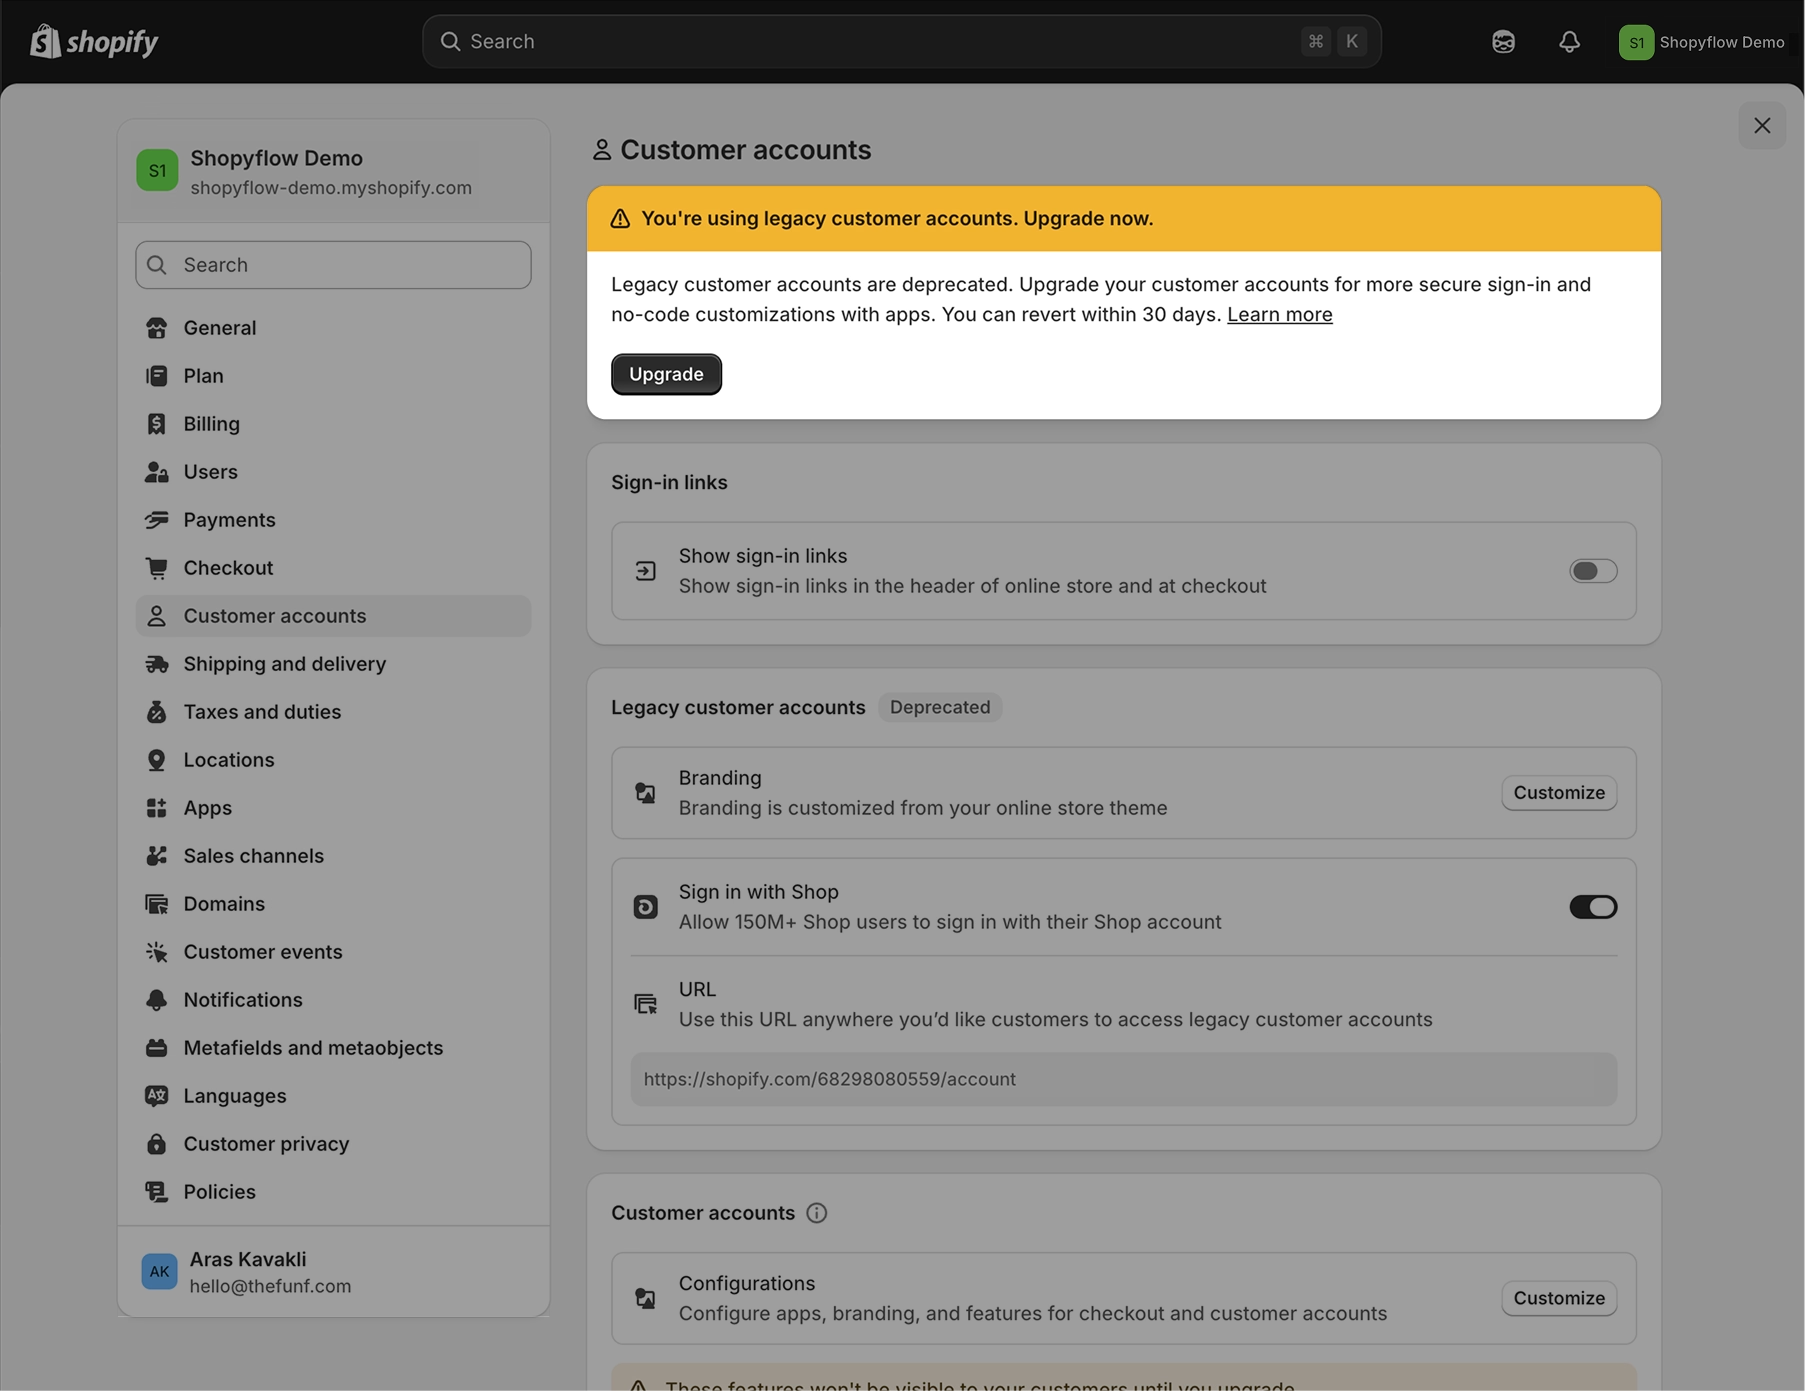
- Go to Settings > Customer accounts
- Make sure you are not on the legacy customer accounts. If you are still on the legacy version, click upgrade. If you do not see the option to upgrade as shown in the image below, you are already using the new customer accounts.
② Customer portal configuration
Next, you need to choose where to host your customer portal. You can use Shopify's own customer portal (Option A: Customer portal in Shopify) or build your account pages in Webflow (Option B: Customer pages in Webflow). These are the mode names you will see in the Storesynk Webflow app (the dropdown also lists Legacy customer pages for older setups). Both modes support wholesale pricing, gated pages and tag-based visibility once you enable customer-only content, as explained later in this section.
Option A: Customer portal in Shopify (recommended)
In this setup, all customer-related pages (login, account details, order details) are hosted in Shopify with limited customization. Your customer will be able to view orders, update addresses and payment methods and manage their subscriptions in the portal. This is the recommended mode for the fastest setup, since Shopify hosts all account pages for you.
Headless App Config
- If you haven't installed the Shopify Headless App, install it. This is the same app that you will install before going live with your site as explained in #2 of the launch checklist.
- Open the headless app and create a storefront if you haven't created one already. If you already have an existing storefront click on it. Make sure your storefront has a meaningful name like Storesynk Headless.
- Inside your storefront, go to Manage API access > Customer Account API by clicking the Manage button.
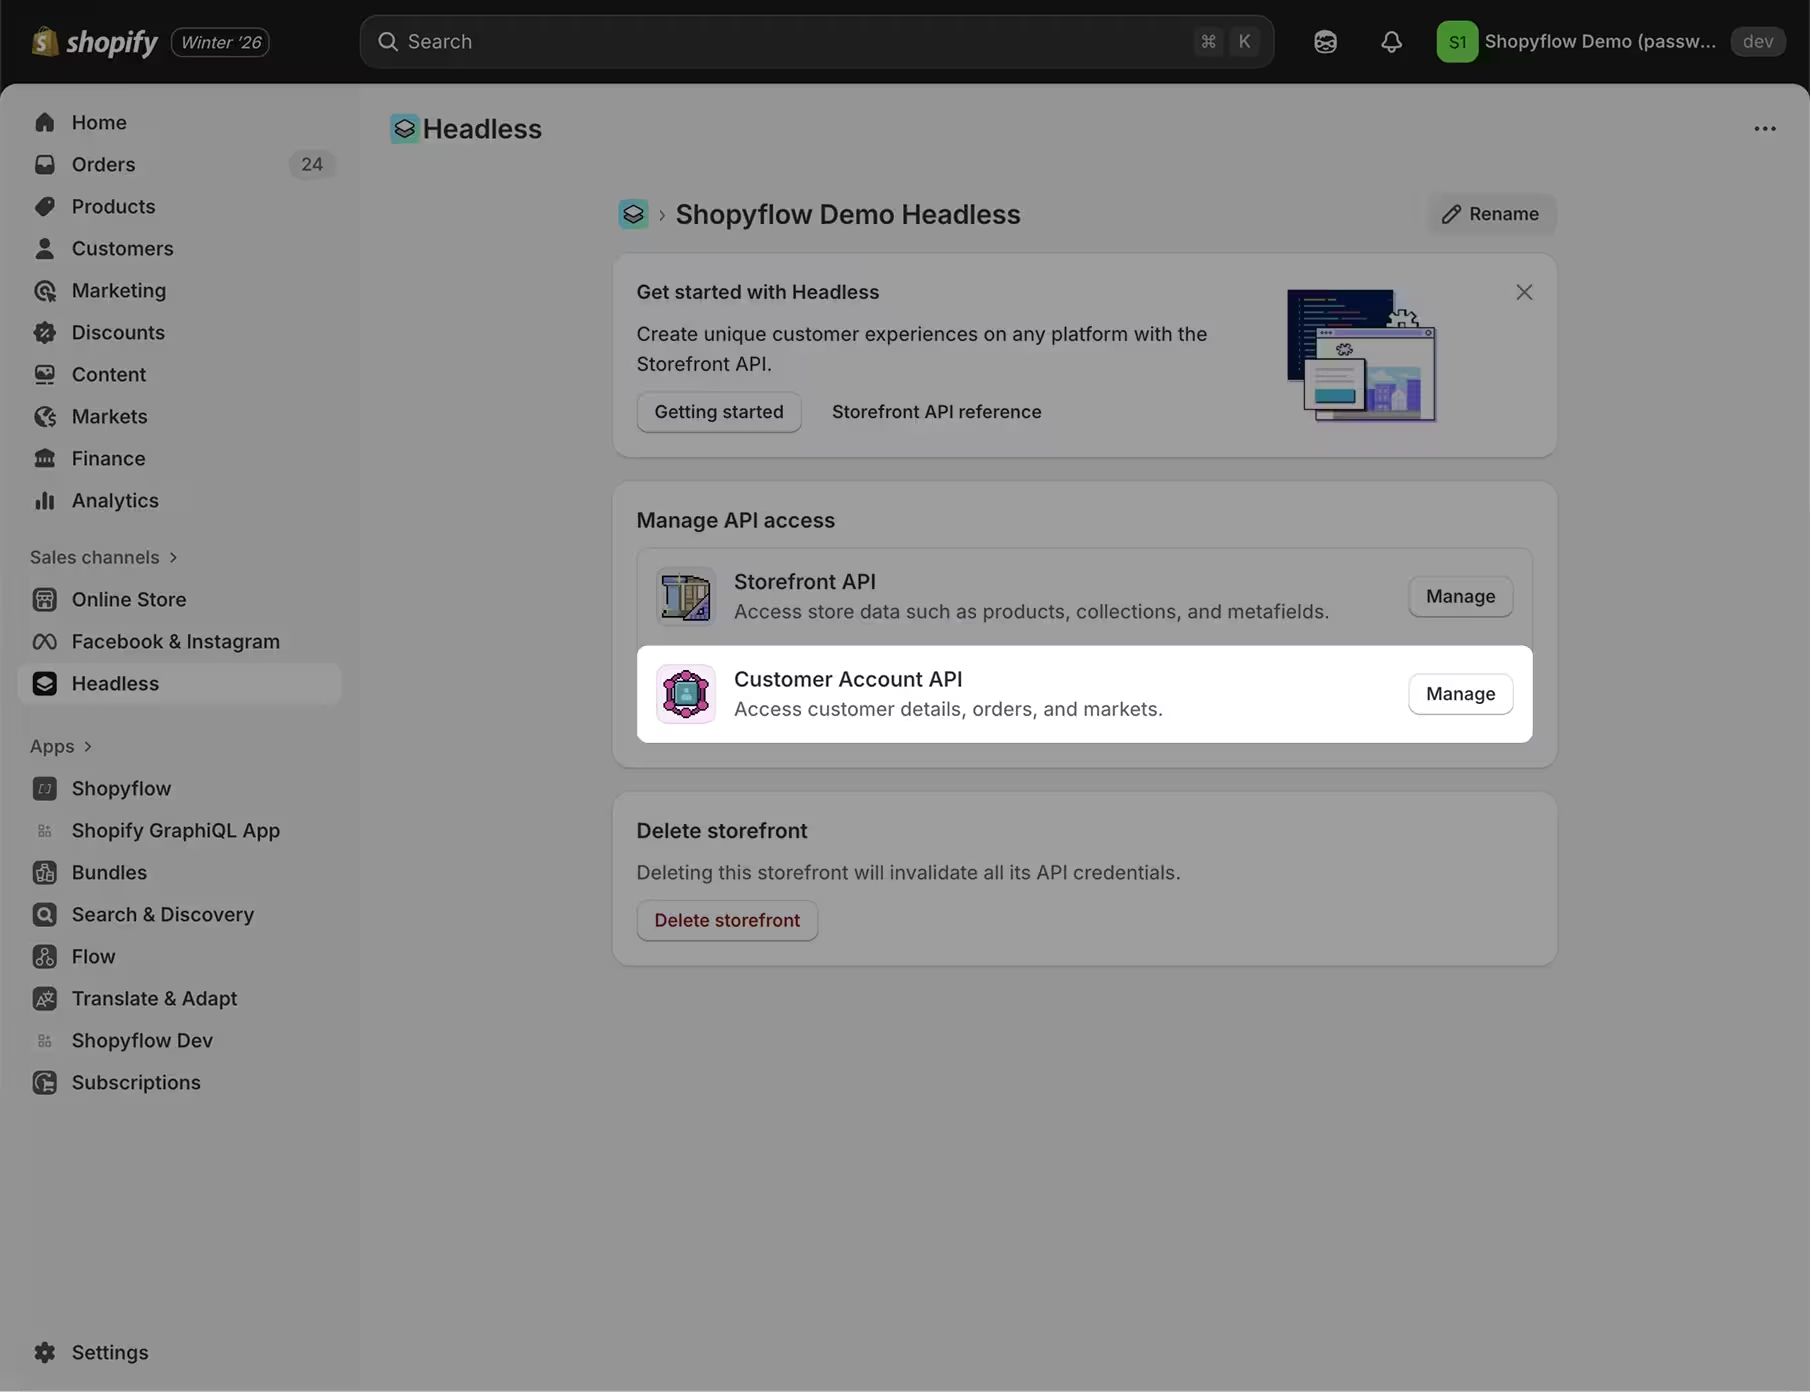
- Find the Permissions section and click on the pen icon.
- Check all the boxes and click Save at the top of the page.

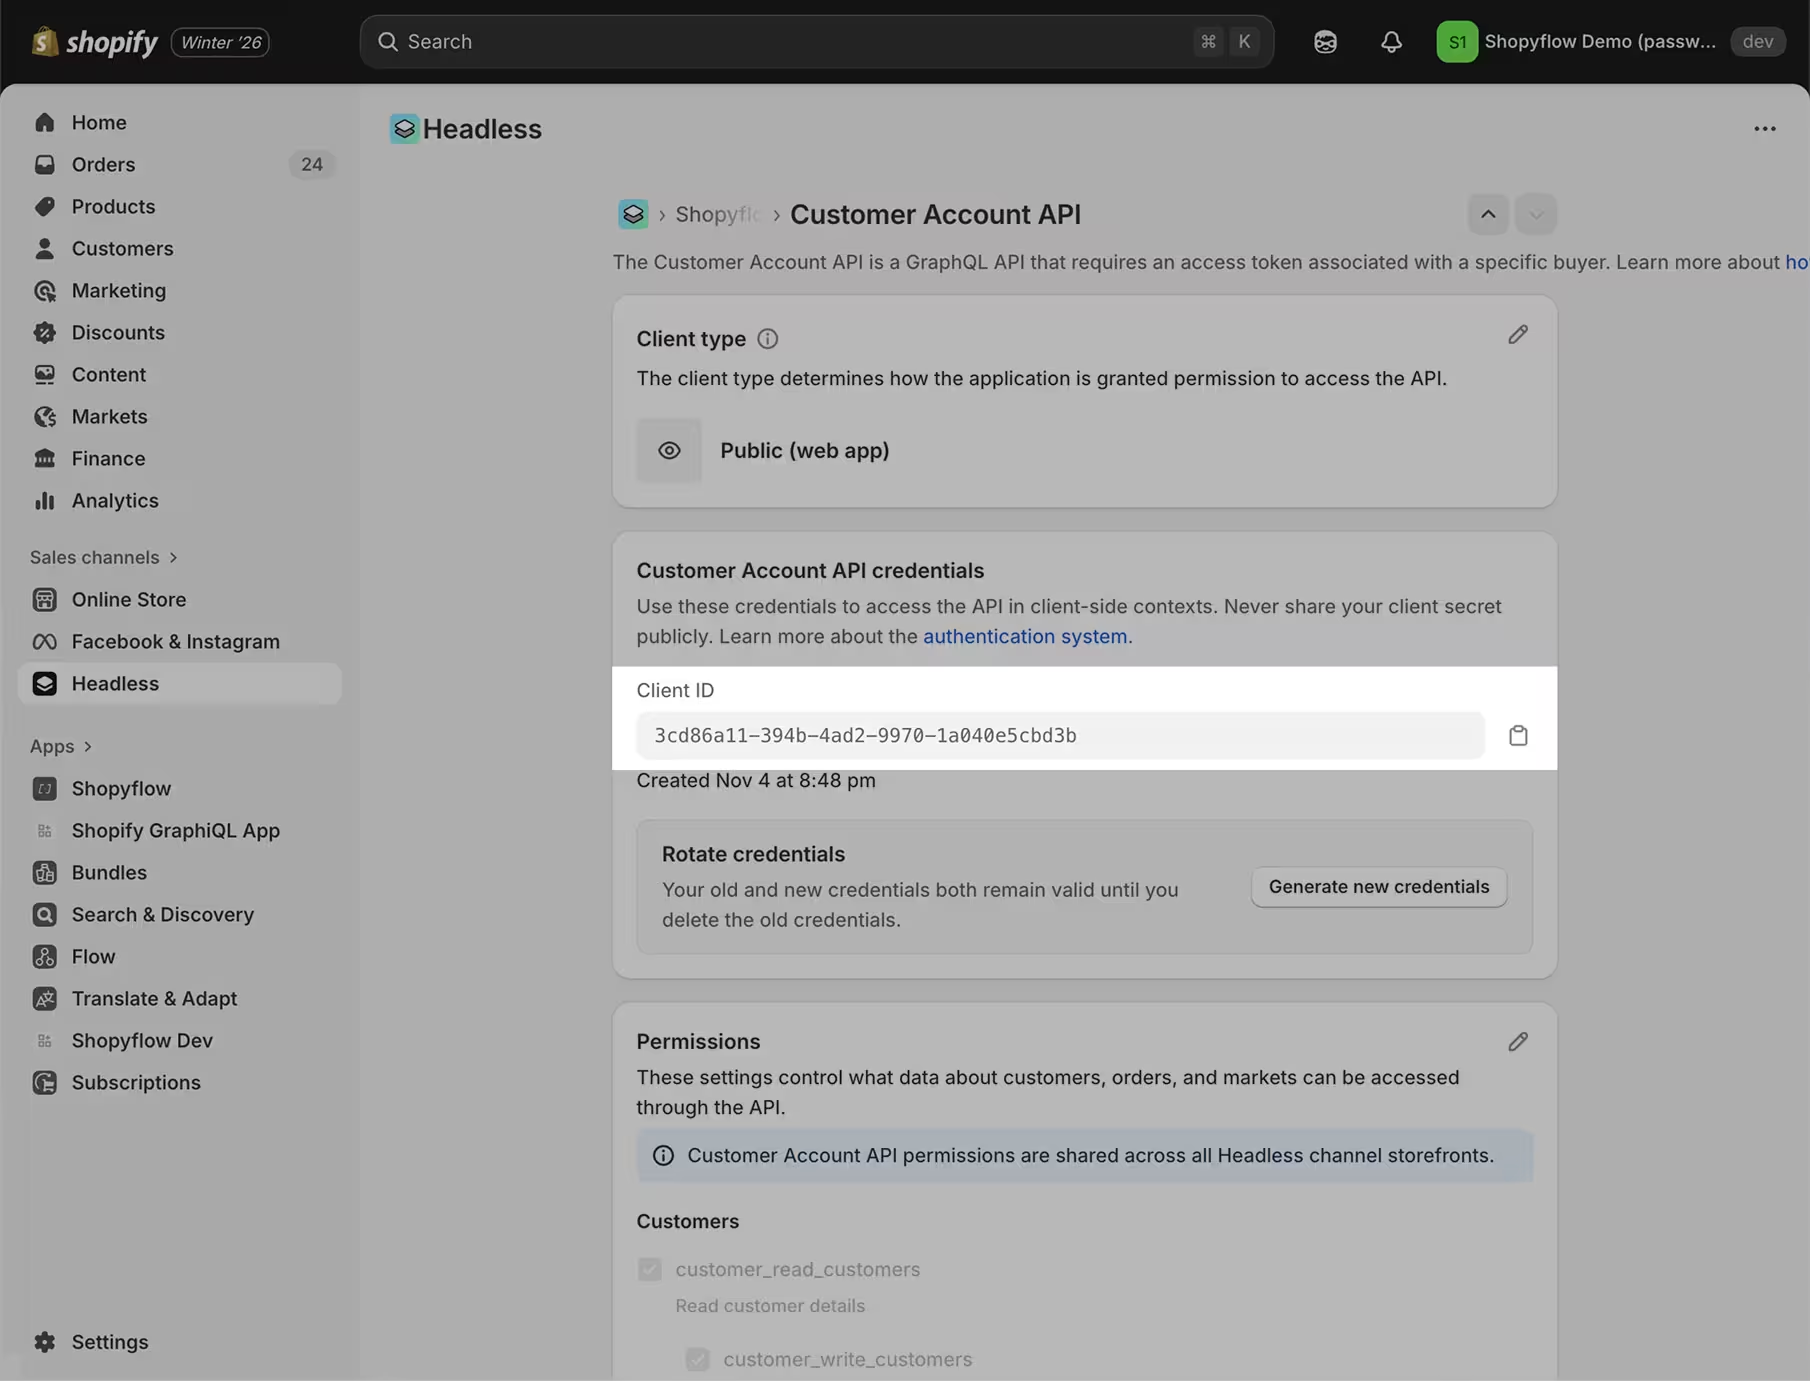
- Scroll to the top and find Customer Account API credentials section and copy the Client ID.
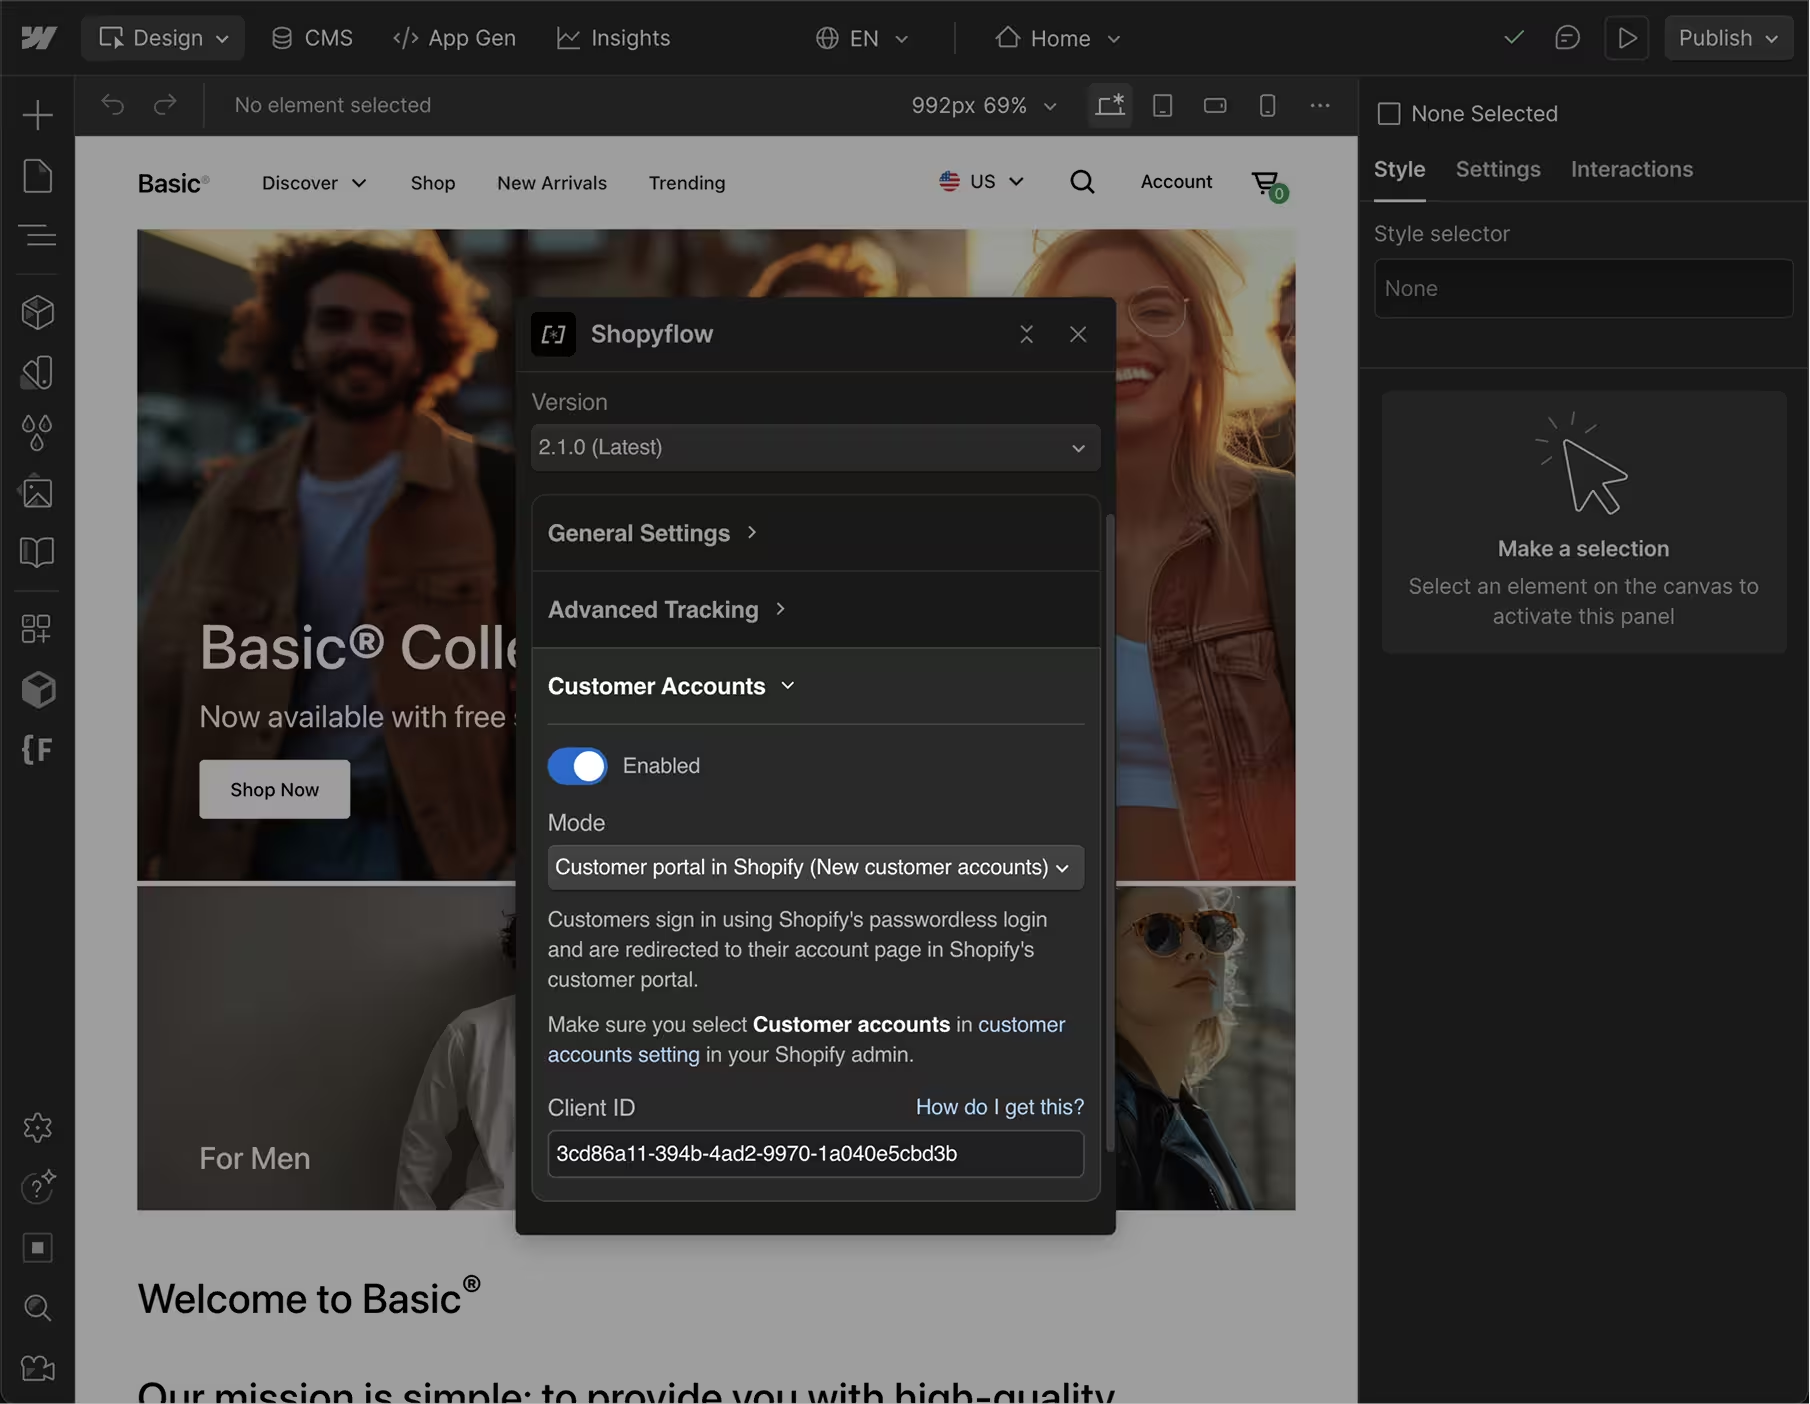
- Go to Storesynk Webflow App > Installation > Customer Accounts and enable it.
- Select the "Customer portal in Shopify" from the dropdown.
- Enter the Client ID you just copied.
- Save & publish your site.
Webflow Config
- Go to Storesynk Webflow App > Store Builder
- Add a Shopify Customer Portal component to your navbar. This will send your users to the customer portal in Shopify.
- You can change the icon of the component or convert it to a text link block. However make sure not to delete its custom attribute.
Customer Account Pages
You are using Shopify's customer portal therefore you don't need to create any account pages in Webflow.
Shopify Theme to Webflow Redirect
In Shopify's customer portal, the "Shop" link in the navbar takes your customers back to your Shopify theme. To prevent that and to send your customers to Webflow instead, you need to use Storesynk's redirect script. Please see #5 of the launch checklist to learn how you can set it up.
Option B: Customer pages in Webflow
In this setup, your passwordless login page is hosted in Shopify, while account and order detail pages are hosted in Webflow and fully customizable. Your customer will be able to view orders and update addresses in Webflow. Subscription management will be handled through subscription app portals.
Headless App Config
- If you haven't installed the Shopify Headless App, install it. This is the same app that you will install before going live with your site as explained in #2 of the launch checklist.
- Open the headless app and create a storefront if you haven't created one already. If you already have an existing storefront click on it. Make sure your storefront has a meaningful name like Storesynk Headless.
- Inside your storefront, go to Manage API access > Customer Account API by clicking the Manage button.
- Find the Permissions section and click on the pen icon.
- Check all the boxes and click Save at the top of the page.
- Scroll to the top and find Customer Account API credentials section and copy the Client ID.
- In Webflow create an account page to be styled later.
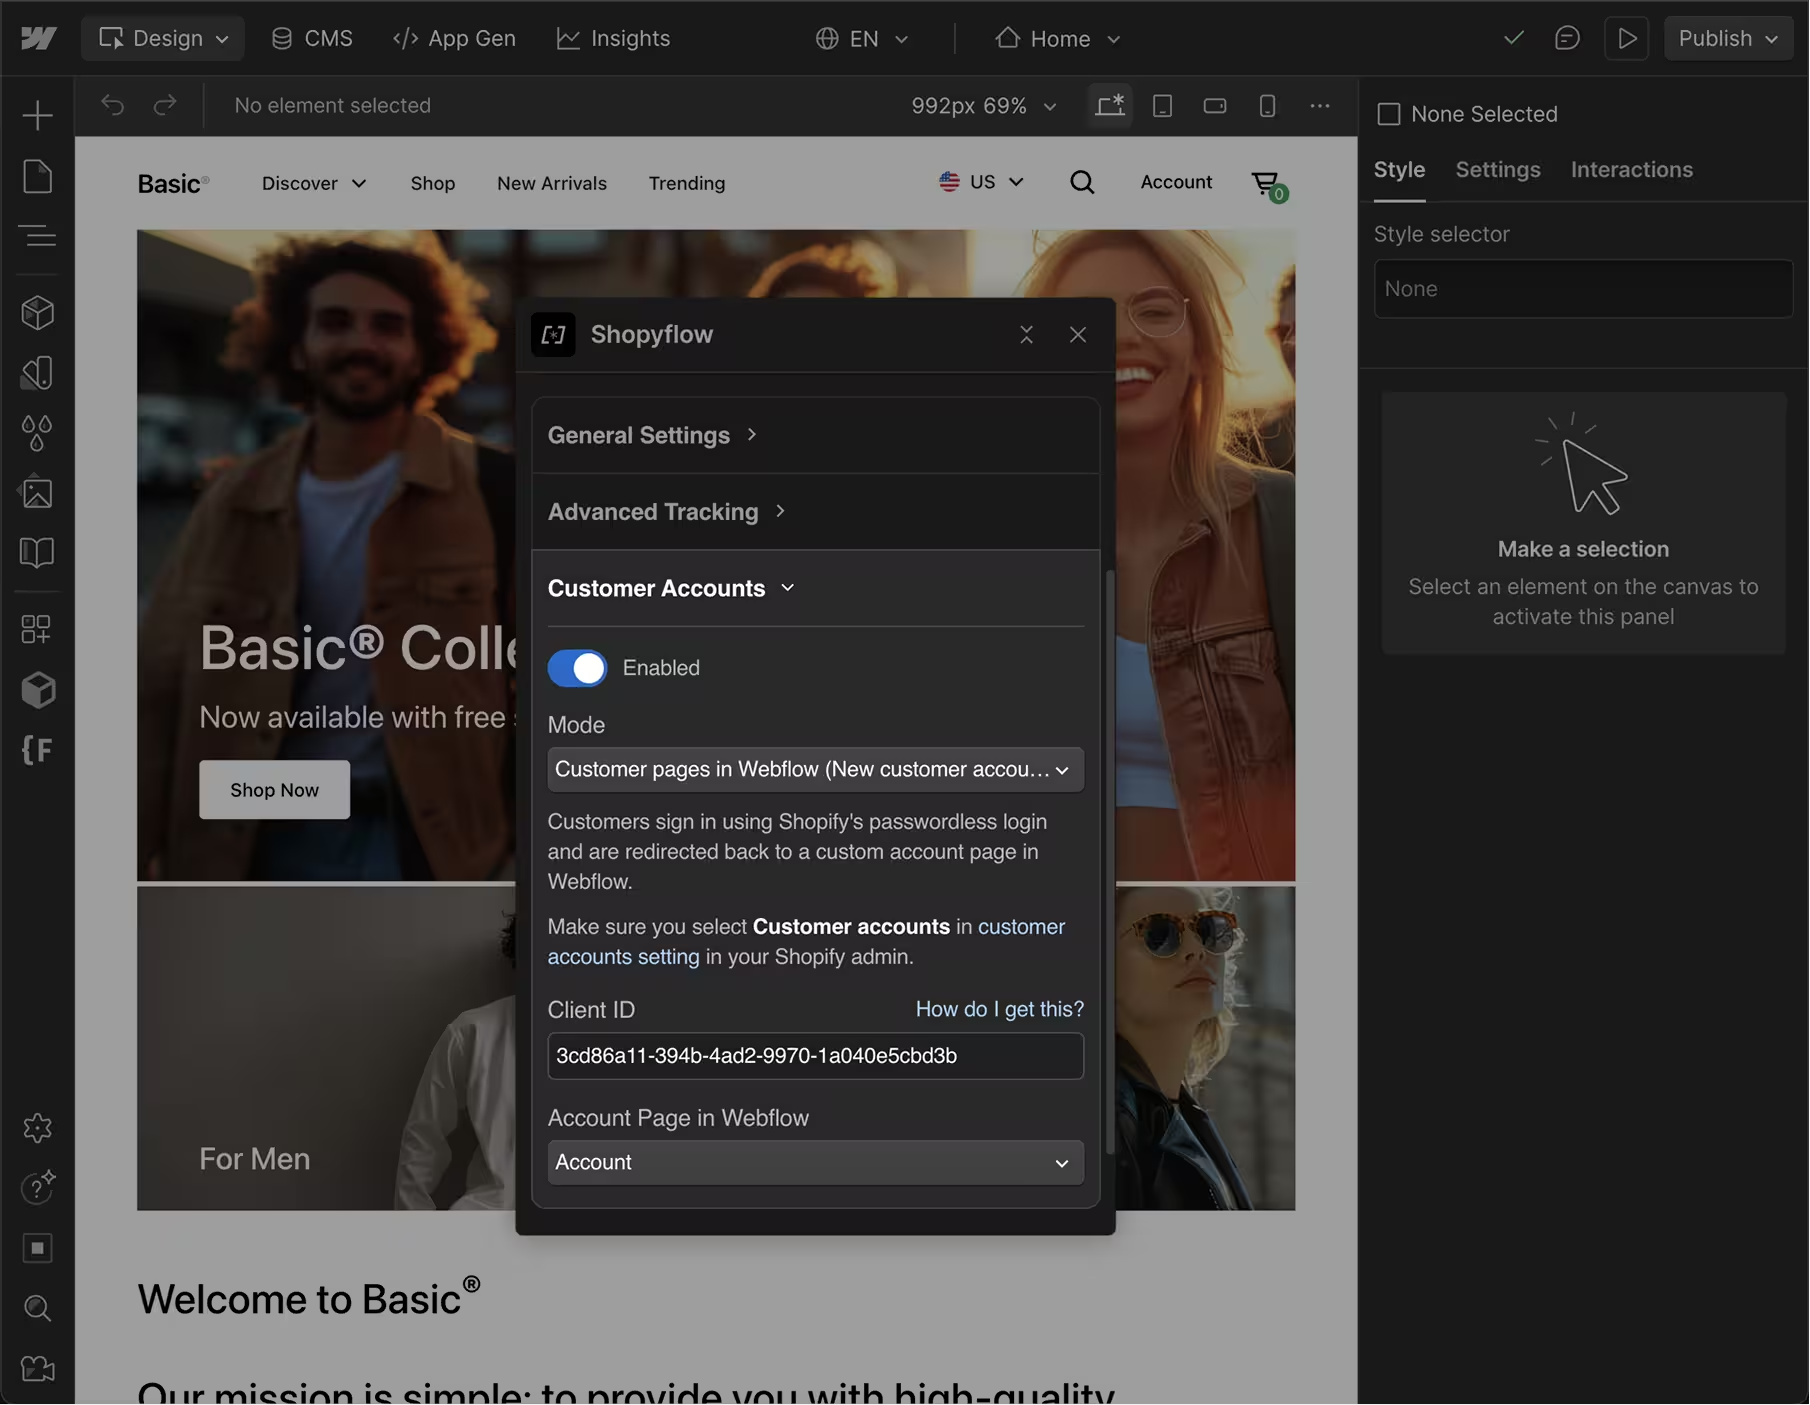
- Go to Storesynk Webflow App > Installation > Customer Accounts and enable it.
- Enter the Client ID you just copied.
- Select "Customer pages in Webflow" from the dropdown.
- Select the newly created account page from the dropdown.
- Go back to the Headless app and scroll down to the Application setup section and click the pen icon to go into edit mode.
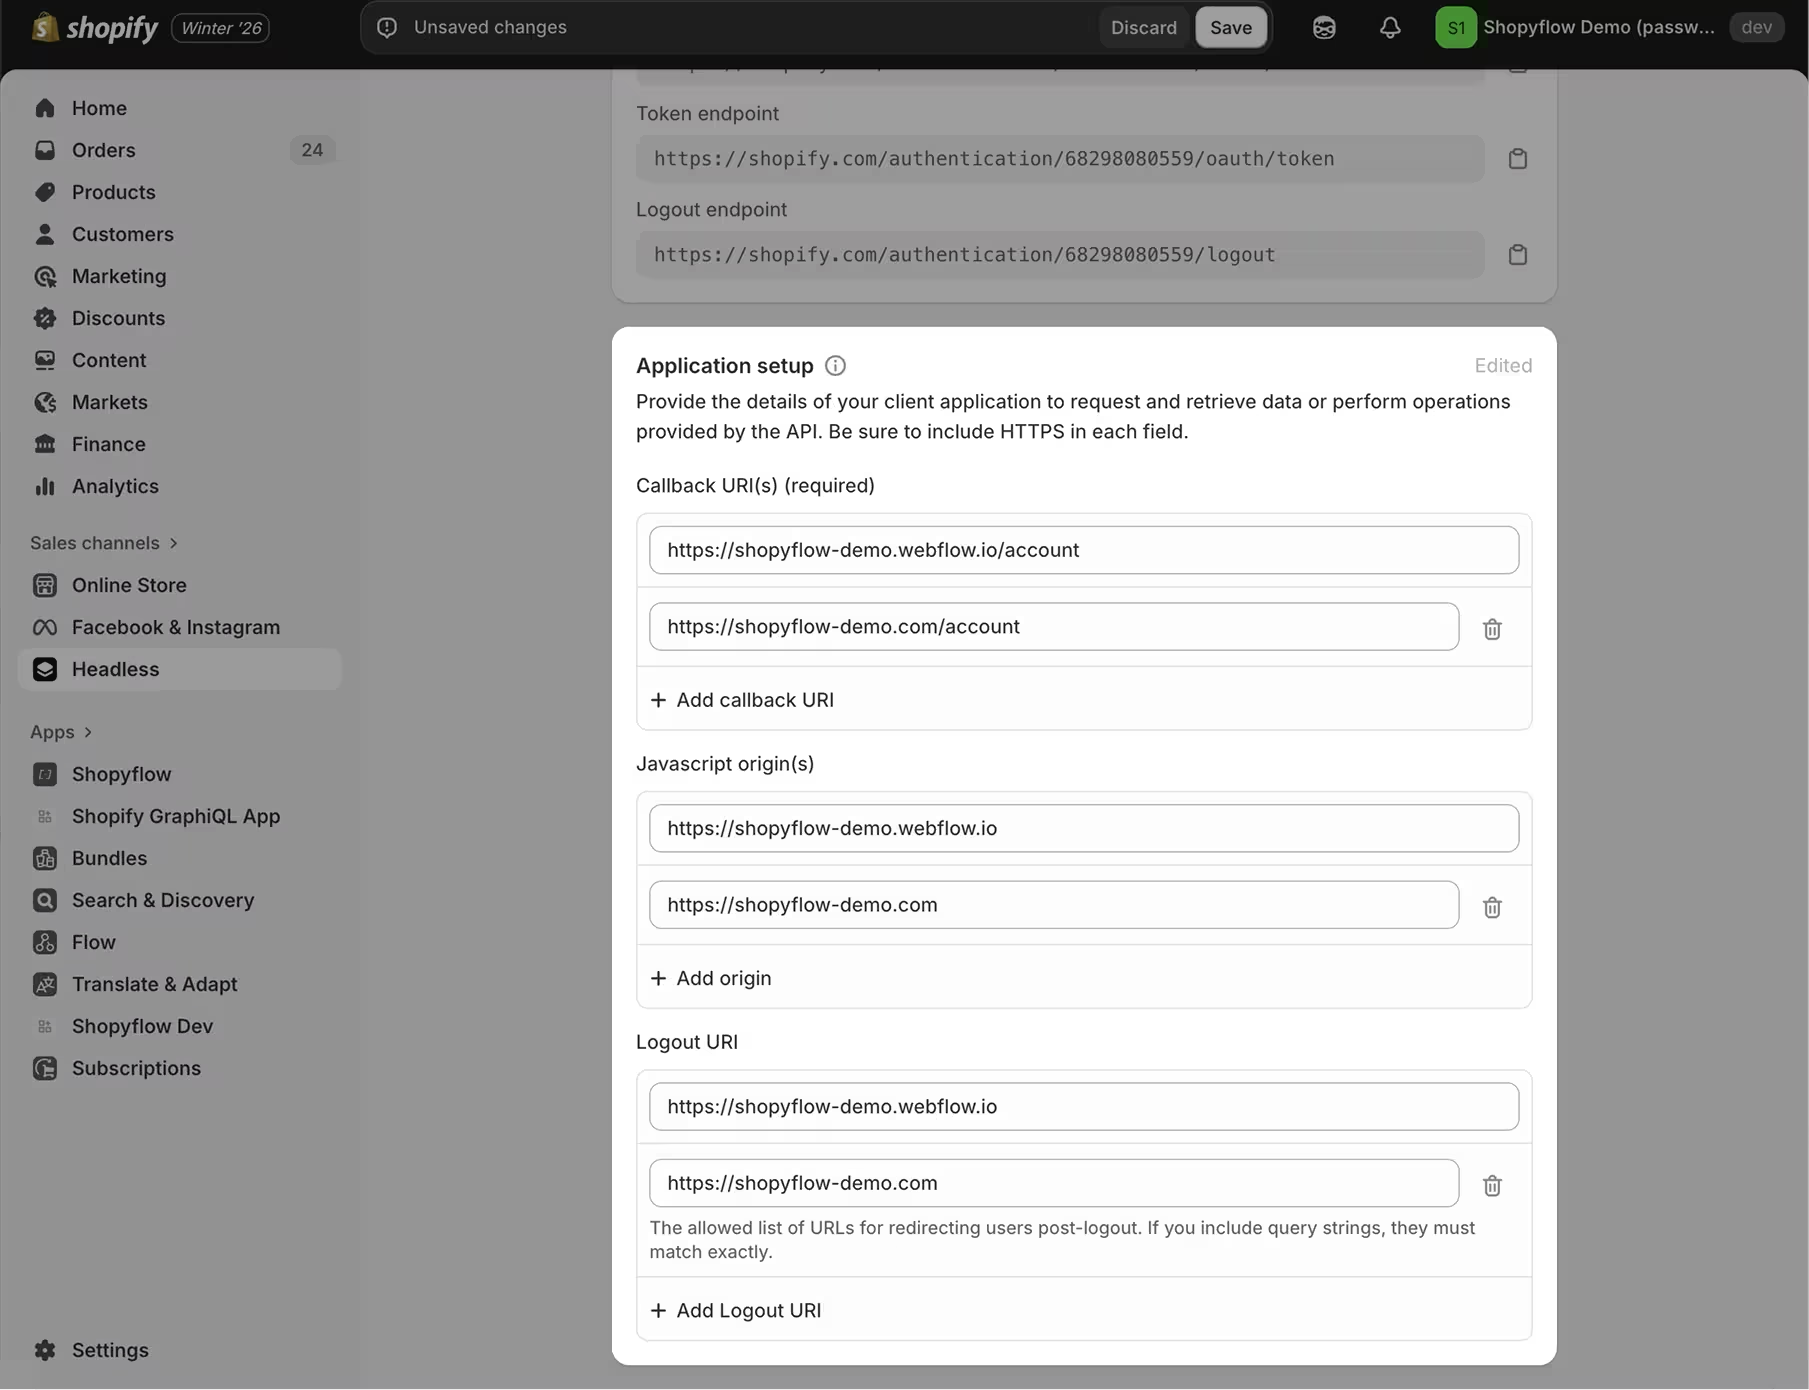
- Add your callback, JS origin and logout URIs. Make sure to enter both your custom and webflow.io URIs so that your customer account setup works on both domains.
Example URIs:
- Callback URIs should point to your account page:
- https://storesynk-demo.com/account
- https://storesynk-demo.webflow.io/account
- Javascript origins should point to your home page:
- https://storesynk-demo.com
- https://storesynk-demo.webflow.io
- Logout URIs should point to your home page:
- https://storesynk-demo.com
- https://storesynk-demo.webflow.io
- Callback URIs should point to your account page:
- Save & publish your site.
Webflow Config
- Go to Storesynk Webflow App > Store Builder and add a User Menu component to your navbar. This login link will send your users to the customer login page hosted by Shopify. After login, your customer lands on the account page. Once you set an Auth Callback Page (see Enable customer-only content below), login instead returns your customer to the page they started from, and an optional Post-login Page overrides where clicked logins land.
- Connect the My Orders link inside your user menu to your account page.
Customer Account Pages
- Go to Storesynk Webflow App > Store Builder and add these components to your account page:
- Order History
- Address List
- New Address Form
- Update Address Form
- Create a new page to display order details.
- Navigate to the newly created order detail page. Go to Storesynk Webflow App > Store Builder and add an Order Detail component.
- Go back to your account page and connect the Order No element's link to your newly created order detail page.
- Publish your site.
Enable customer-only content (callback login)
Both modes support customer-only content in Webflow: wholesale pricing, gated pages and tag-based visibility. It works through a callback login flow. When a customer logs in from your Webflow site, they round-trip through Shopify's secure login screen and return to a callback page on your site, where Storesynk completes the session and forwards them onward. You never write any configuration, the app derives the technical auth settings automatically.
Follow the below steps to enable it:
- In Webflow, create a blank page for the callback, for example /auth-callback. The page needs no content, Storesynk handles everything on it.
- In the callback page's settings, turn off sitemap indexing and add
<meta name="robots" content="noindex">to the page's head custom code. The page is a technical interstitial and search engines should not index it. - Go to Storesynk Webflow App > Installation > Customer Accounts and select your new page as the Auth Callback Page. In Customer portal in Shopify mode, turn on Enable customer-only content in Webflow first: the Auth Callback Page selector appears under the toggle. In Customer pages in Webflow mode, the Auth Callback Page is one of the page settings; it is optional on its own but required as soon as you use gated pages or a custom post-login page.
[SCREENSHOT: Customer Accounts settings in the Storesynk Webflow app with customer-only content enabled and the Auth Callback Page selector visible]
- Register your callback page as a Callback URI in the Shopify Headless app: open your storefront, go to the Application setup section and add the callback page's URL for both your custom domain and your webflow.io domain, the same way you registered the URIs earlier on this page.
Example URIs:
- https://storesynk-demo.com/auth-callback
- https://storesynk-demo.webflow.io/auth-callback
- In Customer pages in Webflow mode these come on top of your account page URIs from Option B, keep both registered.
[SCREENSHOT: The Application setup section in the Shopify Headless app with the auth callback page URIs added to Callback URIs]
- Optionally, select a Post-login Page (available in Customer pages in Webflow mode). By default your customer returns to the page they started from after login. The Post-login Page overrides where a clicked login lands. It applies only to logins started from a login button or link: gated page redirects and background session refreshes always return the customer to where they were. When nothing else applies, the account page is the final fallback.
[SCREENSHOT: Post-login Page setting in the Customer Accounts settings]
- Save & publish your site.
③ Use custom domain for your Shopify customer portal
Before starting, make sure your primary Shopify domain is a custom domain. You cannot use a custom domain for your customer portal if your store is still using a myshopify domain.
- Go to your domain host (e.g. GoDaddy, Namecheap, etc.) and open up your main domain's (e.g. mywebsite.com) DNS settings.
- Create a CNAME record as follows:
- name = The subdomain for your customer account pages (e.g. account)
- value = shops.myshopify.com
- Go to Shopify Admin > Settings > Customer accounts
- Click Change domain
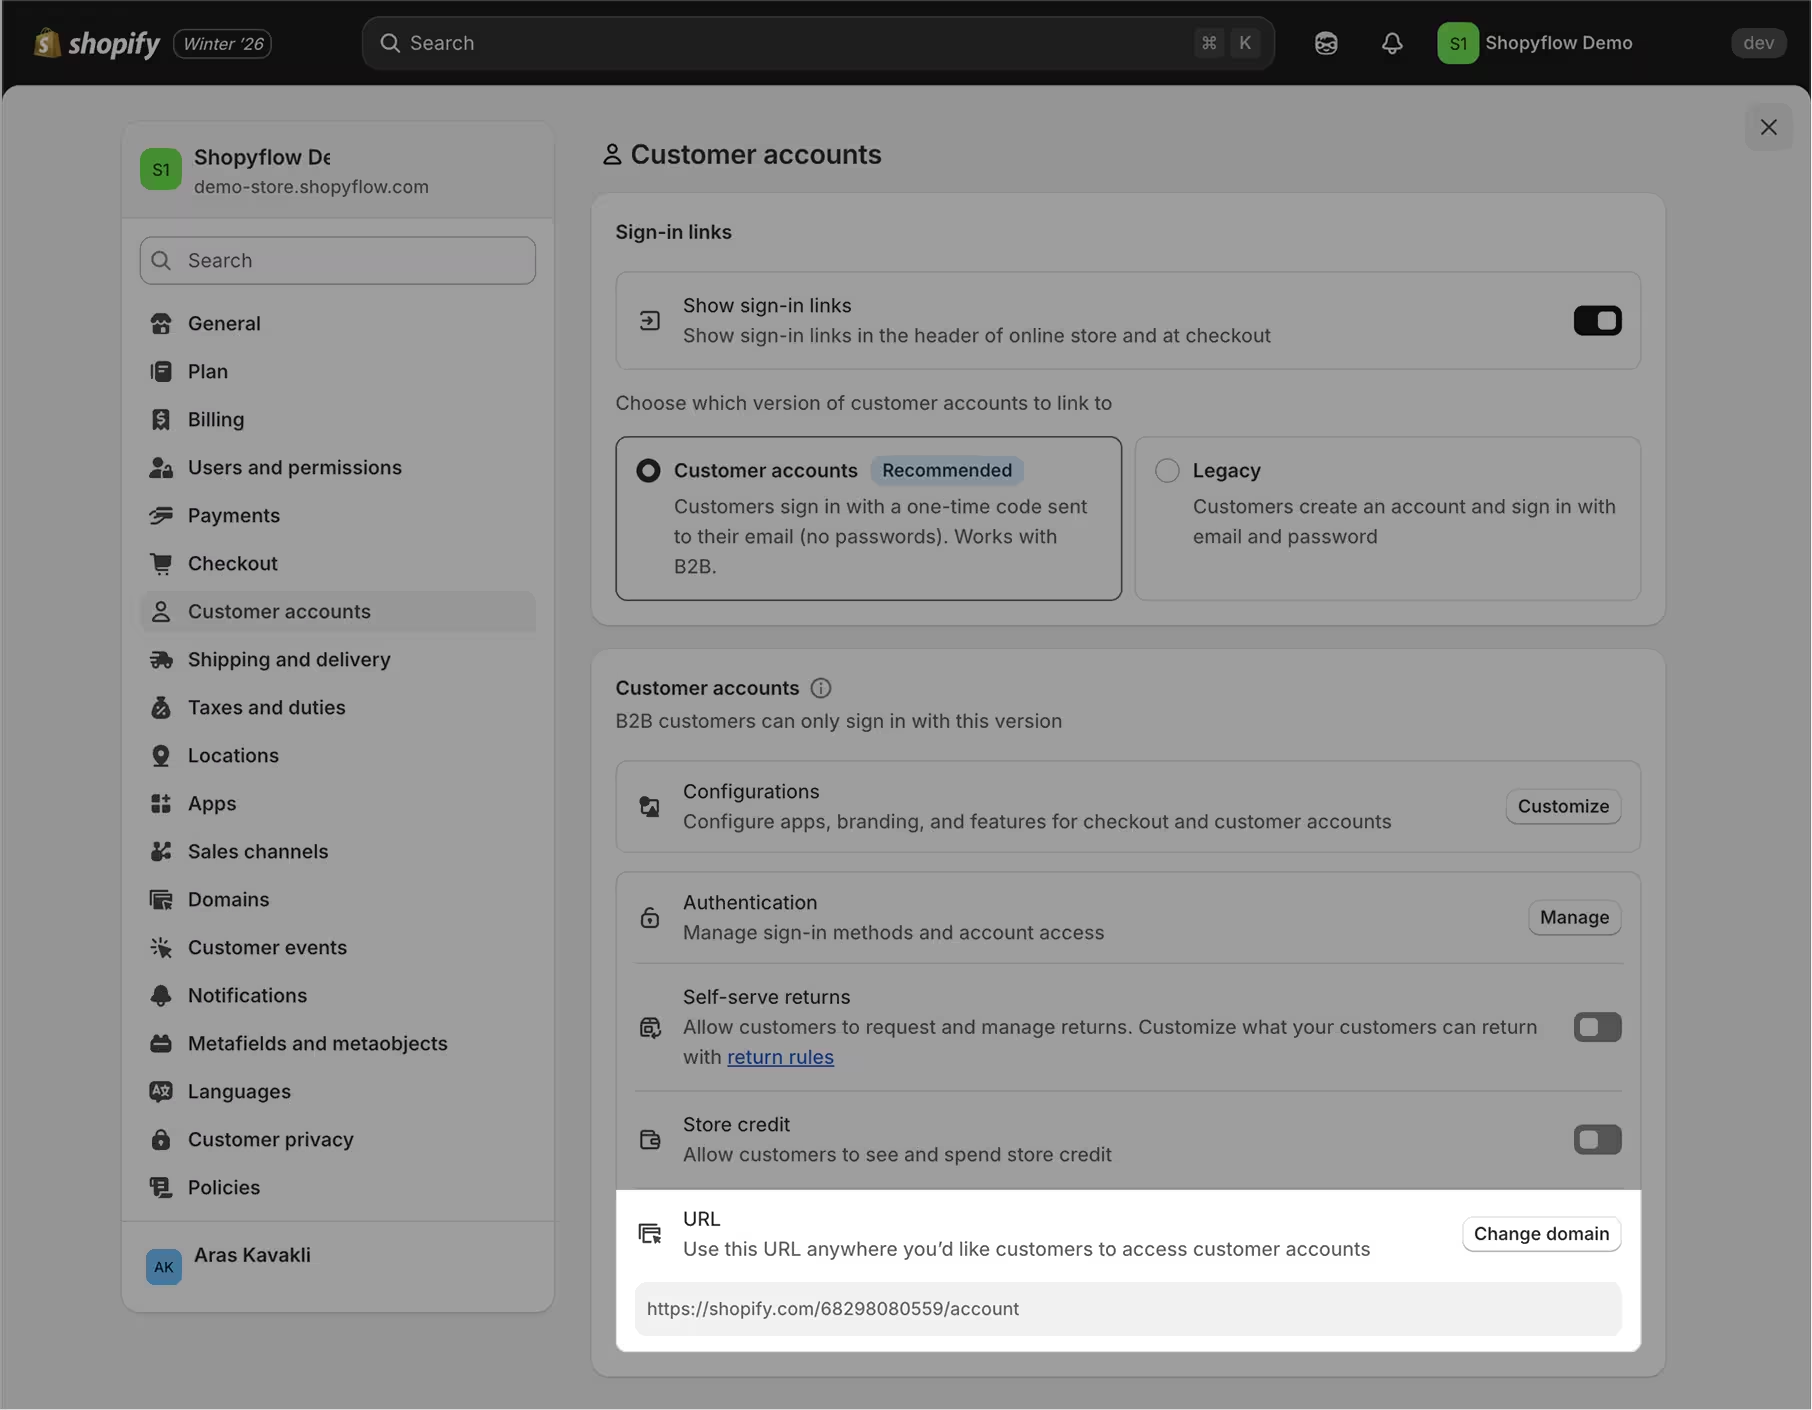
- Enter the subdomain you just created for your customer accounts (e.g. account) and click continue.
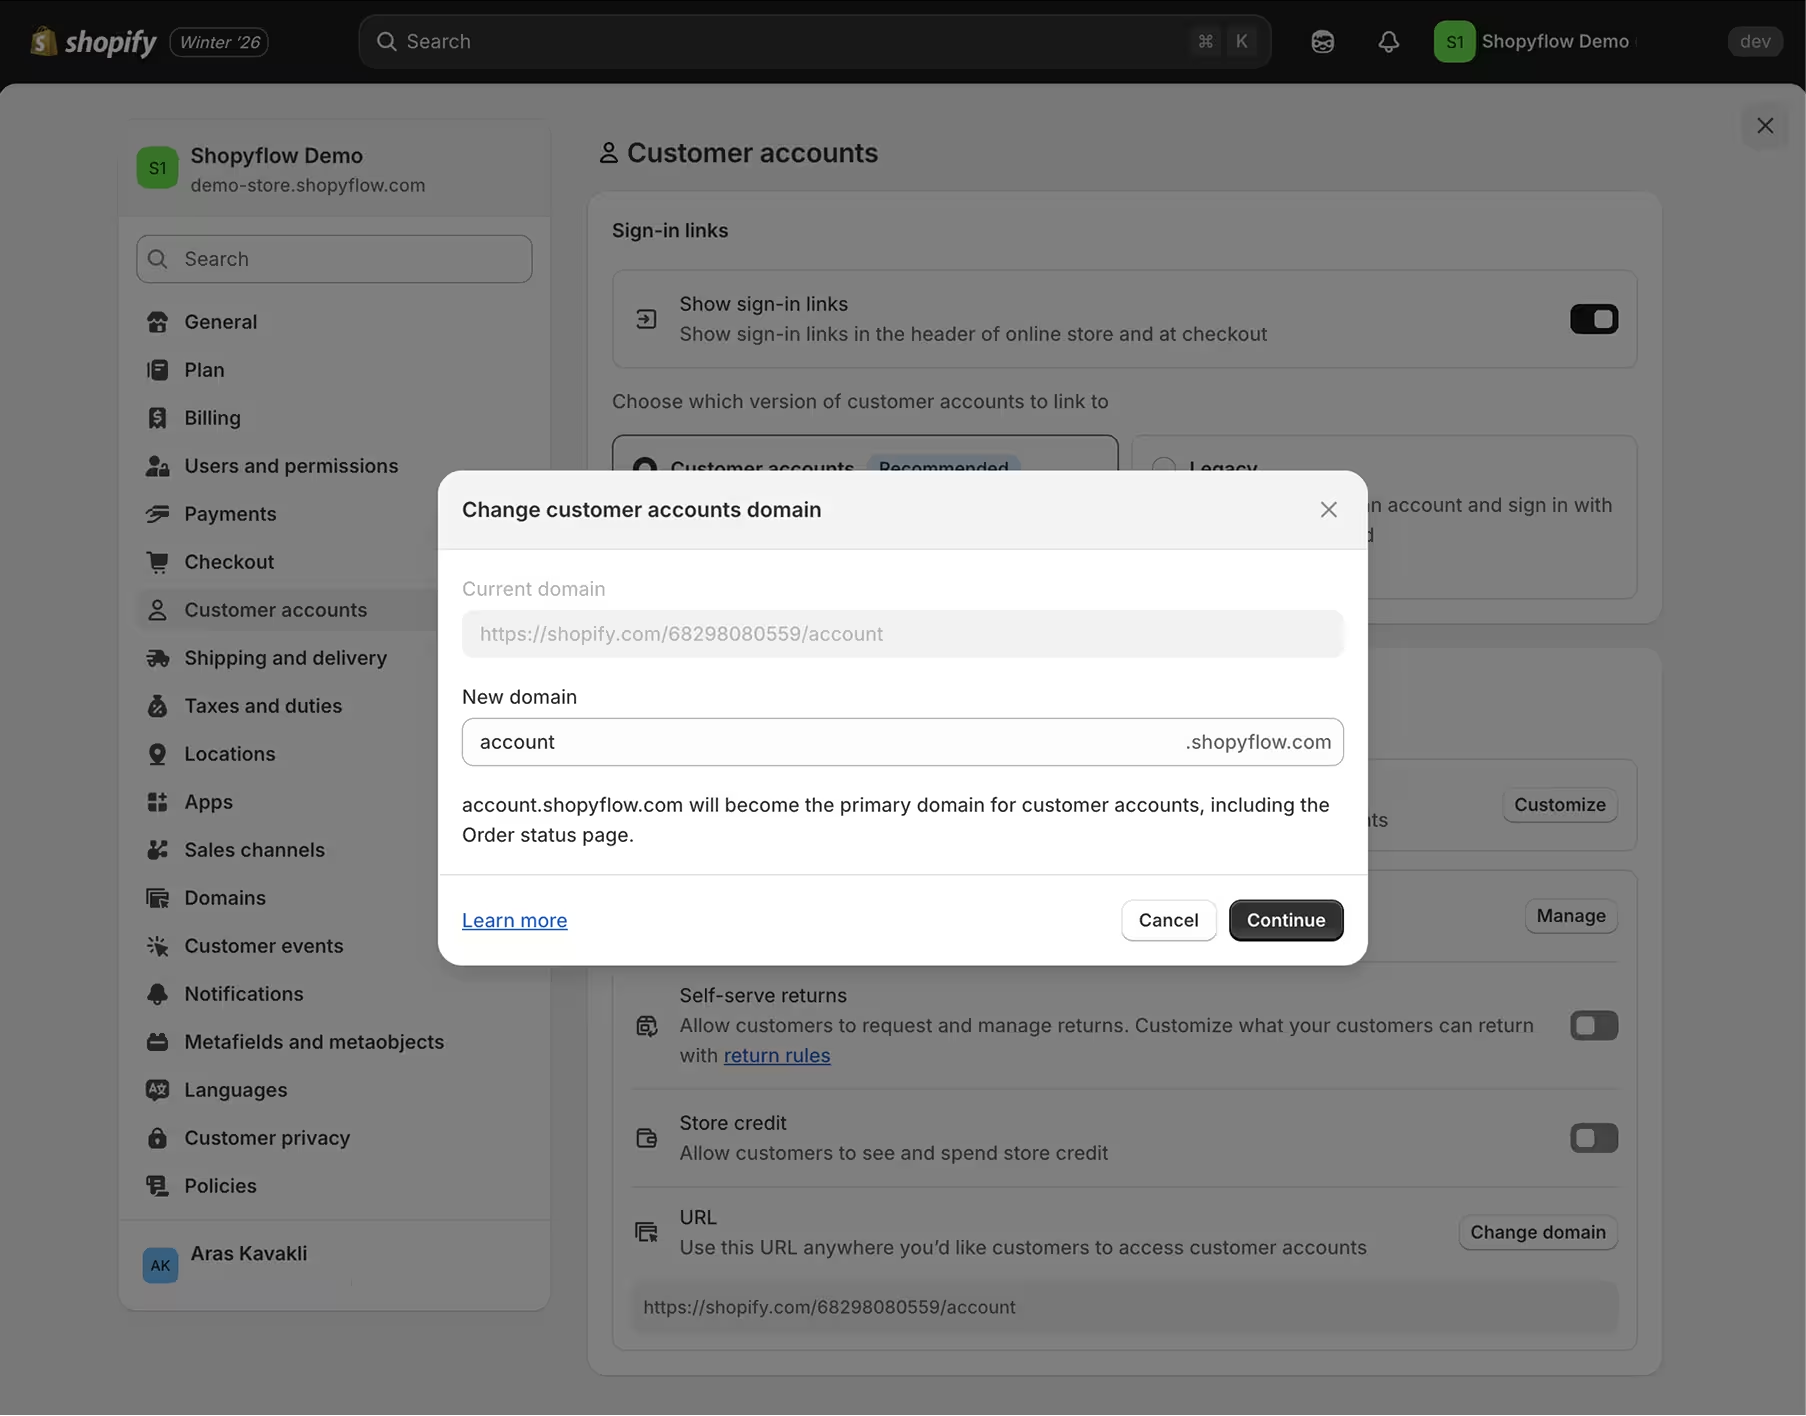
- After Shopify finishes provisioning the TLS certificate, you can start using the custom domain for your account pages. No further action is required in Storesynk, the new accounts domain will be detected automatically.
④ Gated pages
Gated pages let you make entire Webflow pages available only to logged-in customers, or only to customers with specific tags: perfect for wholesale hubs, member areas and VIP content. If you sell wholesale, see how to sell wholesale in Webflow with Storesynk for how customer group tags power wholesale hubs.
Follow the below steps to gate a page:
- Complete the Enable customer-only content (callback login) setup above.
- In Storesynk Webflow App > Installation > Customer Accounts, find the gated pages list and add a row for each page you want to gate. Each row takes:
- the page to gate
- optional customer group tags: only logged-in customers with one of these tags can view the page, matching is case-insensitive
- an optional fallback page: where logged-in customers without a required tag are sent, the home page when no fallback is set
[SCREENSHOT: Gated pages list in the Customer Accounts settings, showing a row with a page, customer group tags and a fallback page]
- Save & publish your site.
Here is how gating behaves on your published site:
- A logged-out visitor opening a gated page is sent to login and returned to that page afterward.
- A logged-in customer without one of the required tags is redirected to the fallback page.
- If a customer's access is revoked while they are on a gated page, they are bounced back to login.
⑤ Hide/Show content based on logged-in state and customer tags
You can use the attributes below to hide elements from logged out users or to show elements only to customers with certain tags in Shopify.
<!-- Visible to any logged-in customer -->
<div sf-auth="1">Welcome back!</div>

<!-- Visible only to customers with the "wholesale" or "retailers" tag -->
<div sf-auth="wholesale,retailers">Exclusive wholesale content</div>

<!-- Visible only to logged-out visitors -->
<div sf-unauth="1">Please log in</div>

<!-- Visible to everyone without the "wholesale" tag -->
<div sf-unauth="wholesale">Apply for wholesale access</div>
sf-auth and sf-unauth both accept customer tags as a comma-separated list. Matching is case-insensitive and any match wins. sf-auth="1" shows the element to any logged-in customer, while sf-auth="wholesale,retailers" shows it only to logged-in customers with one of those tags. sf-unauth also accepts tags: sf-unauth="wholesale" shows the element to everyone without that tag, both guests and logged-in customers lacking it. This makes it the natural gate for an "apply for access" call to action.
Elements with sf-auth no longer flash before the login state resolves: Storesynk keeps them hidden until the session is known. This works on Storesynk version 2.3.0 or above.
Using the Shopify customer portal with customer tags
Gating content with customer tags (for example wholesale) used to require setting up account pages in Webflow. It is now built in. Stay in Customer portal in Shopify mode and complete Enable customer-only content (callback login) above: the visibility attributes on this page, gated pages and wholesale pricing then work directly on your Webflow site.
For your navbar, we recommend this setup:
- Add both the User Menu and Shopify Customer Portal components from the Store Builder into your navbar. Copy the Shopify Customer Portal component into the User Menu.
- Give the Shopify Customer Portal component the sf-auth="1" custom attribute so that it's visible only to logged-in customers.
- Remove the My Orders link from the User Menu.
- Keep the Login link in the User Menu.
Your final User Menu component should look similar to this after these steps:
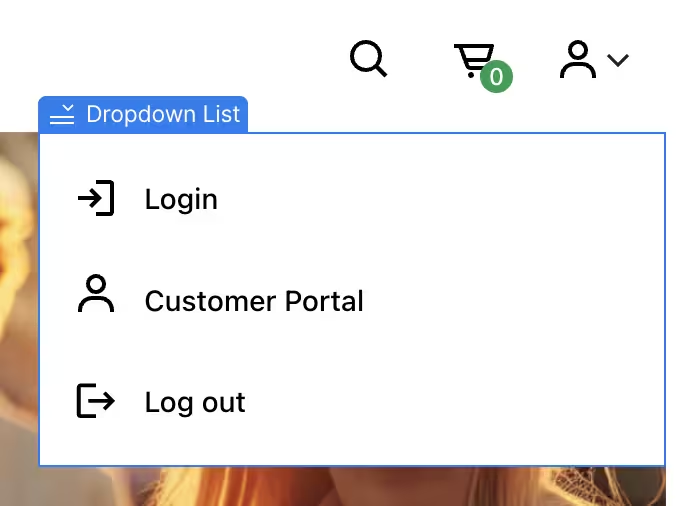
Once these steps are complete, your customers can manage their orders in the Shopify customer portal while you gate content in Webflow with customer tags and gated pages.
